“`html
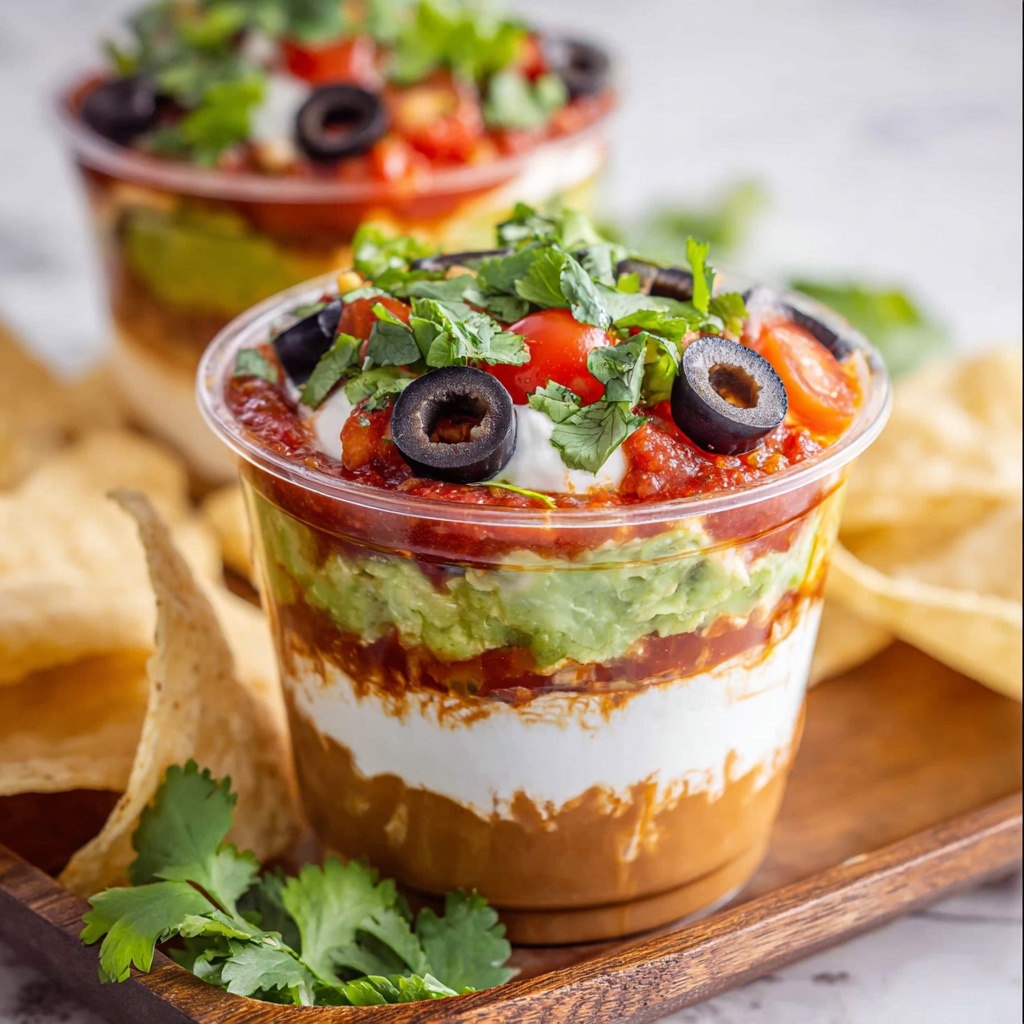
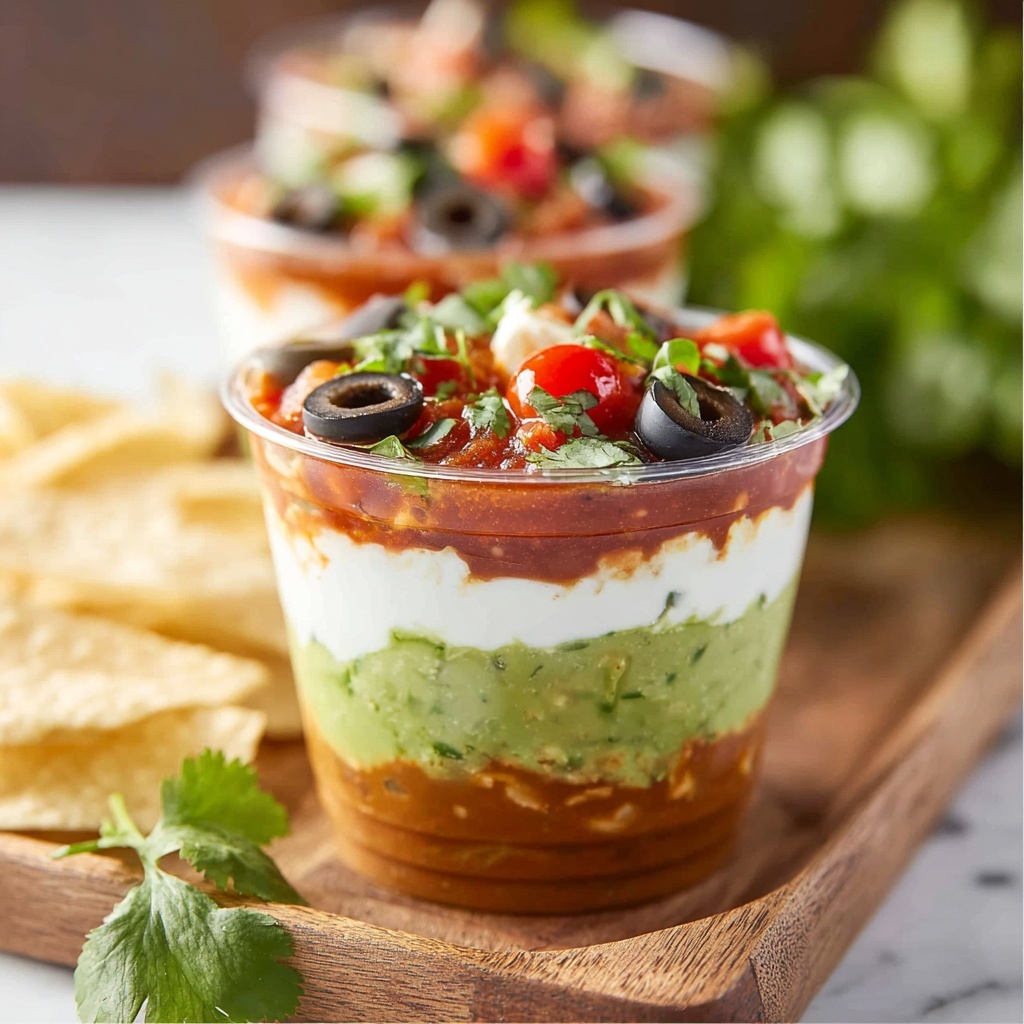
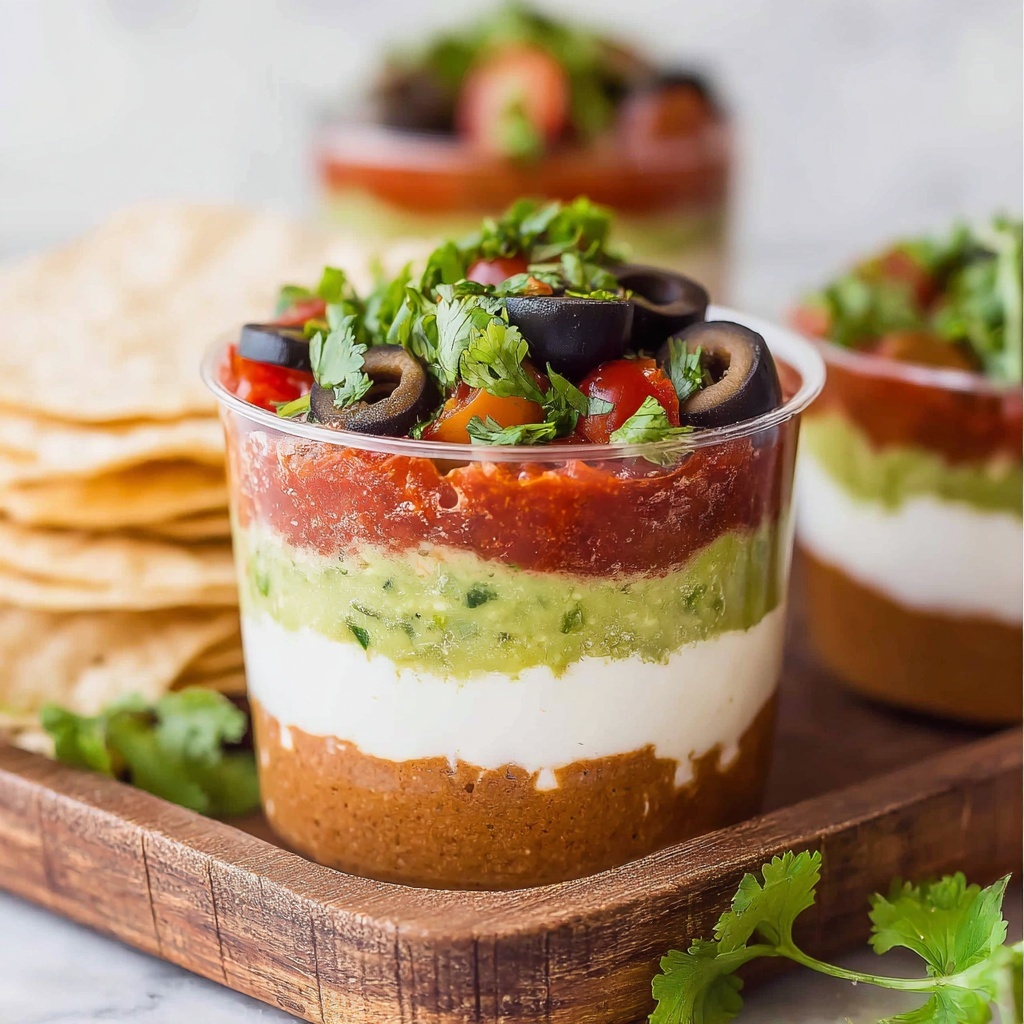
If you’re looking for a fun, colorful, and absolutely crowd-pleasing appetizer, look no further than this 7 Layer Dip Cups Recipe. Perfectly portioned and packed with all the layers you love—creamy refried beans, zesty guacamole, cool sour cream, tangy salsa, melty cheese, briny olives, and fresh tomatoes—these individual cups bring all the party vibes without the mess. The ease of layering each vibrant ingredient in a cup makes snacking both neat and super satisfying. Whether you’re hosting game day, a casual get-together, or just craving a flavorful snack, this recipe is a winner that’s guaranteed to impress and delight.
Ingredients You’ll Need
Simple ingredients are truly the foundation of this 7 Layer Dip Cups Recipe, each one playing a crucial role in building layers of flavor, texture, and color that make this appetizer irresistible. From creamy beans to fresh tomatoes, every element contributes a unique touch, creating a harmony that’s as visually enticing as it is delicious.
- 16 oz. refried beans: Provides a creamy, hearty base layer with rich, comforting flavor.
- 1 oz. taco seasoning packet: Adds a burst of southwestern spice to the beans, infusing the dip with savory depth.
- 2-4 tbsp heavy cream: Helps achieve the perfect creamy, spreadable bean consistency without watering down taste.
- 8 oz. Fiesta blend shredded cheese (divided): Brings gooey, melty goodness and a pop of color between layers.
- 16 oz. guacamole: Creamy and fresh, it adds cool richness and vibrant green color.
- 16 oz. sour cream or plain Greek yogurt: Adds tang and a velvety smooth texture, balancing the bold flavors.
- 1 cup chunky salsa: Provides a juicy, slightly spicy flavor and a touch of acidity for brightness.
- 2.25 oz. sliced black olives: Offers a salty, briny punch that contrasts beautifully with creamy layers.
- ½ cup cherry tomatoes (quartered): Freshness and juiciness that brighten the dip’s flavor profile.
- 3 tbsp chopped fresh cilantro (or parsley): Herbaceous notes that lift and refresh the entire dish.
- Tortilla chips (for serving): Crunchy vessels for scooping up all the delicious layers with a satisfying snap.
How to Make 7 Layer Dip Cups Recipe
Step 1: Prep Your Cups
Start by grabbing eight 9-ounce clear disposable cups. Using clear cups lets all those gorgeous layers shine through, making your snack not just tasty but also visually inviting. It’s an easy step that gets your setup ready for layering perfection.
Step 2: Warm the Refried Beans
Pop the refried beans into a microwave-safe bowl and heat for 1-2 minutes, stirring often. Warming the beans softens them and blends flavors better in the next step, plus it helps the taco seasoning melt in beautifully.
Step 3: Spice and Creamify the Beans
Stir in the taco seasoning, 2 tablespoons of heavy cream, and ¼ cup of the shredded cheese. Mix well until the cheese melts and the beans are smooth. This gives you a rich, flavorful bean layer that’s worth savoring on its own.
Step 4: Adjust Consistency
Let the beans cool just enough to handle, then check the texture—if it feels too stiff to spread, add heavy cream, one tablespoon at a time, stirring until it’s creamy but not runny. The perfect consistency means your layers will be luscious and easy to work with.
Step 5: Layer the Beans
Divide the bean mixture evenly among your cups, spooning about ¼ cup into each. This hearty first layer sets a flavorful base and provides a solid foundation for the rest of the ingredients.
Step 6: Pipe the Guacamole
Scoop all the guacamole into a piping bag or a zip-top bag with a corner snipped off. Piping it in a circle close to the cup edges gives a neat, professional look and helps fill the center evenly for that perfect green layer.
Step 7: Even Out the Guacamole Layer
Use a spoon to gently smooth the guacamole so it forms an even layer atop the beans in every cup. This step ensures that every bite has a consistent blend of flavor and texture.
Step 8: Add a Creamy Sour Cream Layer
Using a clean piping bag, add sour cream or Greek yogurt on top of the guacamole, smoothing it into an even, cool layer. This layer balances the zesty and rich layers with a soothing tang and creamy finish.
Step 9: Pour and Spread Salsa
Carefully spoon about ¼ cup of chunky salsa over the sour cream, spreading it gently with a spoon to keep the top nicely even. The salsa adds vibrant color and a burst of juicy spice that keeps things interesting.
Step 10: Sprinkle Cheese
Top each cup with another ¼ cup of shredded Fiesta blend cheese right over the salsa. The cheese melts slightly from the warmth below and adds an irresistible gooey texture and festive touch.
Step 11: Garnish the Final Touches
Finish by topping every cup with a tablespoon of sliced black olives, a tablespoon of quartered cherry tomatoes, and a teaspoon of chopped fresh cilantro. These garnishes add bursts of color, saltiness, juiciness, and fresh herbaceous notes that take your dip cups to the next level.
Step 12: Add a Fun Chip Garnish
If you want to impress, tuck a tortilla chip into the side or on top of each cup for an adorable presentation. It’s a playful way to serve and encourages the perfect chip-and-dip combo.
How to Serve 7 Layer Dip Cups Recipe
Garnishes
Beyond the olives, tomatoes, and cilantro, you can get creative with garnish by adding a sprinkle of smoked paprika or a few thinly sliced jalapeños for a subtle kick. A little lime wedge on the side can add a zesty zing that brightens every bite. These touches aren’t just pretty; they deepen the flavor profile in lovely ways.
Side Dishes
These 7 Layer Dip Cups pair wonderfully with a variety of sides like crunchy tortilla chips for dipping, fresh vegetable sticks such as cucumber and bell peppers, or even some warm, soft pita bread. Offering a range of dippers lets guests mix and match to their own snack-loving hearts.
Creative Ways to Present
Serve these layered delights in clear mini mason jars for rustic charm or on a large platter grouped together with extra chips and small bowls of salsa and guacamole on the side. You can also place them on a tiered serving tray for an eye-catching display that’s perfect for parties or potlucks where easy individual servings are a hit.
Make Ahead and Storage
Storing Leftovers
Leftover 7 Layer Dip Cups keep well in the fridge when tightly covered with plastic wrap or sealed in an airtight container. They’re best enjoyed within 2-3 days for maximum freshness and flavor. The layers might mix slightly, but the taste remains just as delicious.
Freezing
Because of the fresh ingredients like guacamole and sour cream, freezing this dip is not recommended as the textures may suffer and turn watery or grainy. For best results, prepare fresh or store leftovers in the fridge only.
Reheating
Since this is a mostly cold dish with some warm layers, reheating isn’t necessary or ideal. If you want warmer beans, you can heat the bean mixture separately and then assemble the cups fresh before serving. Keeping everything else chilled maintains their intended textures and flavors.
FAQs
Can I substitute the sour cream with something healthier?
Absolutely! Plain Greek yogurt is a fantastic, protein-packed alternative that still provides the creamy tang you want without as much fat. It works perfectly in this recipe and complements the other flavors just as well.
Can I make this 7 Layer Dip Cups Recipe vegan?
Yes! Use vegan refried beans (check labels), dairy-free sour cream and cheese alternatives, and skip the heavy cream or substitute with plant-based cream. The guacamole and salsa are naturally vegan, so your cups will still be super flavorful and colorful.
What size cups are best for this recipe?
We recommend 9-ounce clear disposable cups because they’re the perfect portion size for individual servings and really showcase the beautiful layers. You can adjust quantity depending on your guests and occasion.
Can I prepare this recipe ahead of time for a party?
You can assemble the cups a few hours ahead and refrigerate them covered tightly. Just add the fresh garnishes and tortilla chips right before serving to keep everything crisp and vibrant.
What are some good alternatives to refried beans?
If you’re looking to mix it up, try black bean mash or even a seasoned lentil spread for a unique twist. Just make sure the consistency is thick enough to form a good base layer in the cups.
Final Thoughts
This 7 Layer Dip Cups Recipe is a total game changer for entertaining or even casual snacking, offering all the beloved flavors of a classic dip with a fresh, fun twist that’s both mess-free and stunning. Once you give it a try, you’ll be hooked on how approachable and delicious these cups are. So gather your ingredients, dig in, and watch everyone’s faces light up as they enjoy every delicious layer!
“`
Print
7 Layer Dip Cups Recipe
- Prep Time: 15 minutes
- Cook Time: 0 minutes
- Total Time: 15 minutes
- Yield: 8 individual 9-ounce cups
- Category: Appetizer
- Method: No-Cook
- Cuisine: Mexican
Description
This 7 Layer Dip Cups recipe offers a fun and convenient twist on the classic party dip, featuring layers of seasoned refried beans, creamy guacamole, tangy sour cream, chunky salsa, shredded cheese, and fresh toppings, all served in individual clear cups for easy sharing and portion control. Perfect for gatherings, game days, or casual snacking with tortilla chips.
Ingredients
Refried Bean Layer
- 16 oz. refried beans (1 can)
- 1 oz. taco seasoning (1 packet)
- 2–4 tbsp heavy cream
- ¼ cup Fiesta blend shredded cheese (from 8 oz. bag)
Guacamole Layer
- 16 oz. guacamole (1 container)
Sour Cream Layer
- 16 oz. sour cream (1 large tub) or plain Greek yogurt
Salsa Layer
- 1 cup chunky salsa
Cheese Layer
- 6 oz. Fiesta blend shredded cheese (remaining from 8 oz. bag)
Toppings
- 2.25 oz. sliced black olives (1 small can), rinsed if oil-packed
- ½ cup cherry tomatoes, quartered
- 3 tbsp chopped fresh cilantro (or parsley)
Serving
- Tortilla chips (for serving)
Instructions
- Prepare cups: Set out eight 9-ounce clear, disposable cups on your work surface for easy assembly.
- Heat beans: Place the refried beans in a large microwave-safe bowl and heat in the microwave for 1-2 minutes, stirring frequently, until thoroughly warmed.
- Season beans: Mix in the taco seasoning, 2 tablespoons of heavy cream, and ¼ cup of shredded Fiesta blend cheese. Stir until the cheese melts completely and ingredients combine evenly.
- Adjust consistency: Stir the beans several times until cooled enough to handle. The consistency should be thick but easily spreadable; add more heavy cream, 1 tablespoon at a time if needed.
- Layer beans: Spoon approximately ¼ cup of the seasoned bean mixture into the bottom of each cup, spreading evenly.
- Prepare guacamole bag: Transfer all of the guacamole into a piping bag or sealable plastic bag and cut off a small corner to pipe.
- Pipe guacamole: Pipe a ring of guacamole around the inner edge of each cup on top of the beans, then fill the centers with the remaining guacamole evenly.
- Even guacamole: Use a spoon to smooth the guacamole layer into an even, flat layer.
- Repeat with sour cream: Fill another piping or sealable bag with sour cream. Pipe and smooth an even layer of sour cream on top of the guacamole in each cup.
- Add salsa: Spoon ¼ cup of chunky salsa on each sour cream layer and gently spread it out with a spoon to an even layer.
- Sprinkle cheese: Top each cup with ¼ cup of shredded Fiesta blend cheese evenly distributed on the salsa layer.
- Add toppings: Garnish each cup with 1 tablespoon sliced black olives, 1 tablespoon quartered cherry tomatoes, and 1 teaspoon chopped fresh cilantro.
- Serve: Optionally garnish cups with a tortilla chip and serve immediately with extra tortilla chips for dipping.
Notes
- Use sour cream or plain Greek yogurt as a healthier alternative with added protein.
- If using oil-packed olives, rinse them to reduce greasiness.
- To make assembly easier, use piping bags for both guacamole and sour cream layers.
- These individual cups are perfect for parties as they reduce sharing and mess.
- Adjust the amount of heavy cream in beans for preferred spreadability.
- Use any type of tomato if cherry tomatoes are unavailable, just chop accordingly.
- Serve immediately after assembly for best freshness; leftovers can be refrigerated for up to 1 day.

