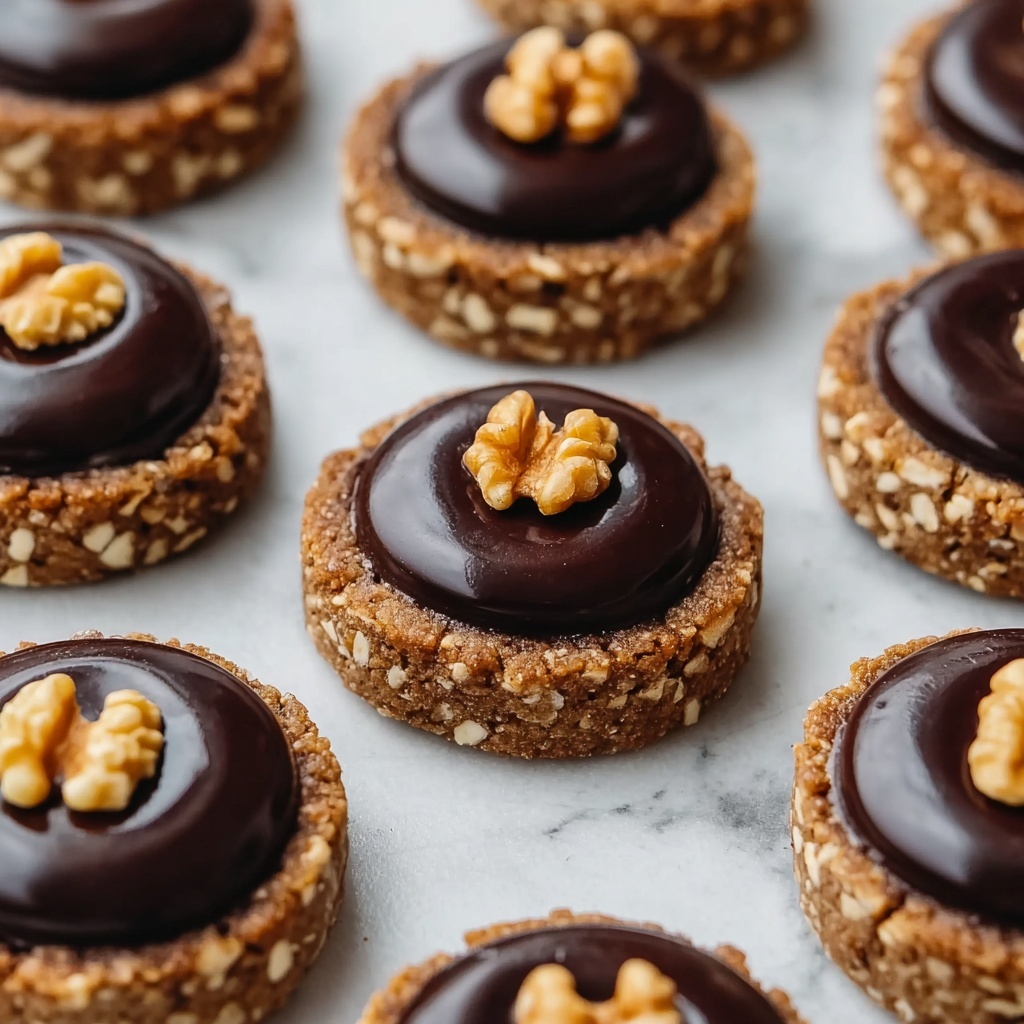
If you’re on the hunt for a cookie that beautifully balances rich chocolate, nutty crunch, and a luscious creamy center, look no further than this Chocolate Hazelnut Thumbprint Cookies Recipe. These delightful treats feature a tender cocoa-infused base rolled in finely chopped hazelnuts, all hugging a gooey dollop of heavenly chocolate hazelnut spread right in the middle. Perfect for sharing or savoring solo, this recipe brings a cozy, irresistible vibe to your baking adventures that’s sure to become a staple in your cookie collection.

Ingredients You’ll Need
Every component in this Chocolate Hazelnut Thumbprint Cookies Recipe plays a vital role, from the buttery softness to the nutty texture and that indulgent chocolate filling. The ingredients list is refreshingly straightforward but promises complex flavors and textures with just a handful of pantry essentials.
- 1 cup unsalted butter, softened: Provides a rich, creamy base that keeps these cookies tender and moist.
- 2/3 cup granulated sugar: Adds the perfect subtle sweetness to balance the cocoa’s bitterness.
- 2 teaspoons vanilla extract: Enhances the depth of flavor with its warm, aromatic notes.
- 2 cups all-purpose flour: The foundation giving structure to these soft thumbprint cookies.
- 1/2 cup cocoa powder: Brings a deep chocolate flavor and gorgeous color to the dough.
- 1/2 teaspoon salt: Lifts the sweetness and gives the chocolate a fuller profile.
- 1/2 cup finely chopped hazelnuts (for rolling): Infuses every bite with delightful crunch and nutty aroma.
- 1/2 cup chocolate hazelnut spread: The star filling that transforms these cookies into pure indulgence.
How to Make Chocolate Hazelnut Thumbprint Cookies Recipe
Step 1: Preheat and Prepare
Start by heating your oven to 350°F (175°C), ensuring it reaches the perfect temperature so your cookies bake evenly. Then, line two baking sheets with parchment paper to prevent sticking and make cleanup a breeze.
Step 2: Cream Butter and Sugar
In a large mixing bowl, cream together the softened butter and granulated sugar until the mixture is light and fluffy. This step is crucial as it aerates the dough, resulting in that melt-in-your-mouth texture. Once creamy, stir in the vanilla extract to infuse subtle aromatic warmth throughout the dough.
Step 3: Combine Dry Ingredients
In a separate bowl, whisk the all-purpose flour, cocoa powder, and salt until thoroughly blended. Gradually add this dry mix into your butter mixture, folding gently until just combined. Avoid over-mixing to keep your cookies tender and soft.
Step 4: Shape and Coat with Hazelnuts
Roll the dough into 1-inch balls, which helps maintain an even size for consistent baking. Next, roll each ball in the finely chopped hazelnuts, giving the cookies a delightful crunch and toasty nutty flavor that complements the chocolate perfectly.
Step 5: Create Thumbprints
Using your thumb or the back of a spoon, press down gently in the center of each ball to create a small well. This indentation will hold the luscious chocolate hazelnut spread after baking, so make sure each thumbprint is deep enough without breaking the dough.
Step 6: Bake and Fill
Place the prepared cookie dough on the lined baking sheets and bake for 12-14 minutes. The cookies should look set but remain soft to the touch when done. While still warm, carefully fill each indentation with a generous dollop of chocolate hazelnut spread, letting it melt slightly into the soft cookie base.
How to Serve Chocolate Hazelnut Thumbprint Cookies Recipe

Garnishes
For an extra-special touch, dust a light sprinkle of powdered sugar over the finished cookies to add a delicate sweetness and a pretty, snow-kissed appearance. You can also add a few whole or chopped hazelnuts on top for impressive texture contrast and visual appeal.
Side Dishes
These cookies pair wonderfully with a steaming cup of coffee or a creamy latte, as the rich chocolate and nutty notes harmonize beautifully with your morning or afternoon pick-me-up. Alternatively, serve alongside a scoop of vanilla ice cream for an indulgent dessert duo.
Creative Ways to Present
For gift-giving or party trays, arrange your Chocolate Hazelnut Thumbprint Cookies Recipe on a decorative platter lined with parchment or doilies. Tie bundles of three or four with rustic twine or place them in a pretty box with tissue paper to make your homemade treats extra enticing and shareable.
Make Ahead and Storage
Storing Leftovers
After your cookies have cooled completely, store them in an airtight container at room temperature. They’ll stay fresh and delicious for up to one week, allowing you to enjoy that fresh-baked feeling whenever the mood strikes.
Freezing
If you want to make these cookies ahead of time, you can freeze the unbaked dough balls rolled in hazelnuts on a baking sheet. Once frozen solid, transfer them to a freezer-safe bag and bake straight from frozen, adding a couple of extra minutes to the baking time. Baked cookies also freeze well in an airtight container for up to three months.
Reheating
To refresh stored cookies, warm them in a low oven (around 300°F or 150°C) for about 5 minutes. This makes the chocolate filling slightly melty again and revives the tender texture, bringing back that just-baked charm.
FAQs
Can I substitute other nuts for hazelnuts?
Absolutely! While hazelnuts provide the classic flavor pairing here, you can swap in finely chopped almonds, pecans, or walnuts. Just be sure to toast them lightly to bring out their best flavor before rolling the dough.
Is this recipe gluten-free?
This particular version uses all-purpose flour, which contains gluten. To make it gluten-free, try substituting with a one-to-one gluten-free flour blend, but be mindful that texture might vary slightly.
How do I prevent the thumbprint from disappearing during baking?
Press gently but firmly to create a well-defined indentation before baking. Avoid making the well too shallow, and don’t overcrowd the baking sheet as cookies tend to spread slightly.
Can I use a different type of chocolate spread?
Definitely! While traditional chocolate hazelnut spread is perfect here, you can experiment with almond butter combined with cocoa powder or even peanut butter with a touch of honey for a unique twist.
How long can I keep these cookies after adding the chocolate spread?
Once filled, it’s best to enjoy the cookies within 2-3 days to experience the fresh soft-baked texture and gooey center. Storing them in an airtight container helps, but the filling may harden over time.
Final Thoughts
Making this Chocolate Hazelnut Thumbprint Cookies Recipe is like creating a little moment of joy in your kitchen. The way the soft cocoa cookie, crunchy nuts, and luscious chocolate hazelnut filling come together is truly magical. Whether you’re baking for a party, gifting loved ones, or simply indulging yourself, these cookies are a comforting, scrumptious treat that never disappoints. Give it a try—you might just find your new favorite cookie!
Print
Chocolate Hazelnut Thumbprint Cookies Recipe
- Prep Time: 20 minutes
- Cook Time: 14 minutes
- Total Time: 34 minutes
- Yield: Approximately 24 cookies
- Category: Dessert
- Method: Baking
- Cuisine: American
Description
These Chocolate Hazelnut Thumbprint Cookies are rich, tender, and filled with a luscious chocolate hazelnut spread center. Rolled in finely chopped hazelnuts for a delightful crunch, these cookies offer a perfect blend of chocolate and nutty flavors ideal for any occasion.
Ingredients
Cookie Dough
- 1 cup unsalted butter, softened
- 2/3 cup granulated sugar
- 2 teaspoons vanilla extract
- 2 cups all-purpose flour
- 1/2 cup cocoa powder
- 1/2 teaspoon salt
Coating & Filling
- 1/2 cup finely chopped hazelnuts (for rolling)
- 1/2 cup chocolate hazelnut spread
Instructions
- Preheat Oven: Preheat your oven to 350°F (175°C) and line two baking sheets with parchment paper to prevent sticking and ensure easy cleanup.
- Cream Butter and Sugar: In a mixing bowl, cream together the softened butter and granulated sugar until the mixture is light and fluffy, which takes about 2-3 minutes with a mixer. Then, add the vanilla extract and mix well to combine the flavors evenly.
- Mix Dry Ingredients: In a separate bowl, whisk together the all-purpose flour, cocoa powder, and salt. Gradually add this dry mixture to the creamed butter mixture, stirring just until all ingredients are incorporated to avoid overmixing and tough cookies.
- Shape and Coat Dough Balls: Roll the dough into 1-inch balls using your hands. Roll each ball in the finely chopped hazelnuts, ensuring they are fully coated to add texture and a nutty crunch.
- Create Indentations: Place the coated dough balls on the prepared baking sheets. Use your thumb or the back of a spoon to gently press an indentation into the center of each ball, creating space for the filling.
- Bake Cookies: Bake the cookies in the preheated oven for 12-14 minutes, until they are set but still soft in the center. Avoid overbaking to maintain a tender texture.
- Fill with Spread: While the cookies are still warm, carefully fill each indentation with chocolate hazelnut spread. Let the cookies cool completely to set the filling.
Notes
- Make sure the butter is softened, not melted, for the best creaming results.
- Chilling the dough for 30 minutes before rolling can help reduce spreading during baking.
- Use a small spoon or piping bag to fill the indentations neatly if preferred.
- Store cookies in an airtight container at room temperature for up to 5 days.
- For a different flavor twist, try rolling the dough balls in chopped pistachios or almonds instead of hazelnuts.


