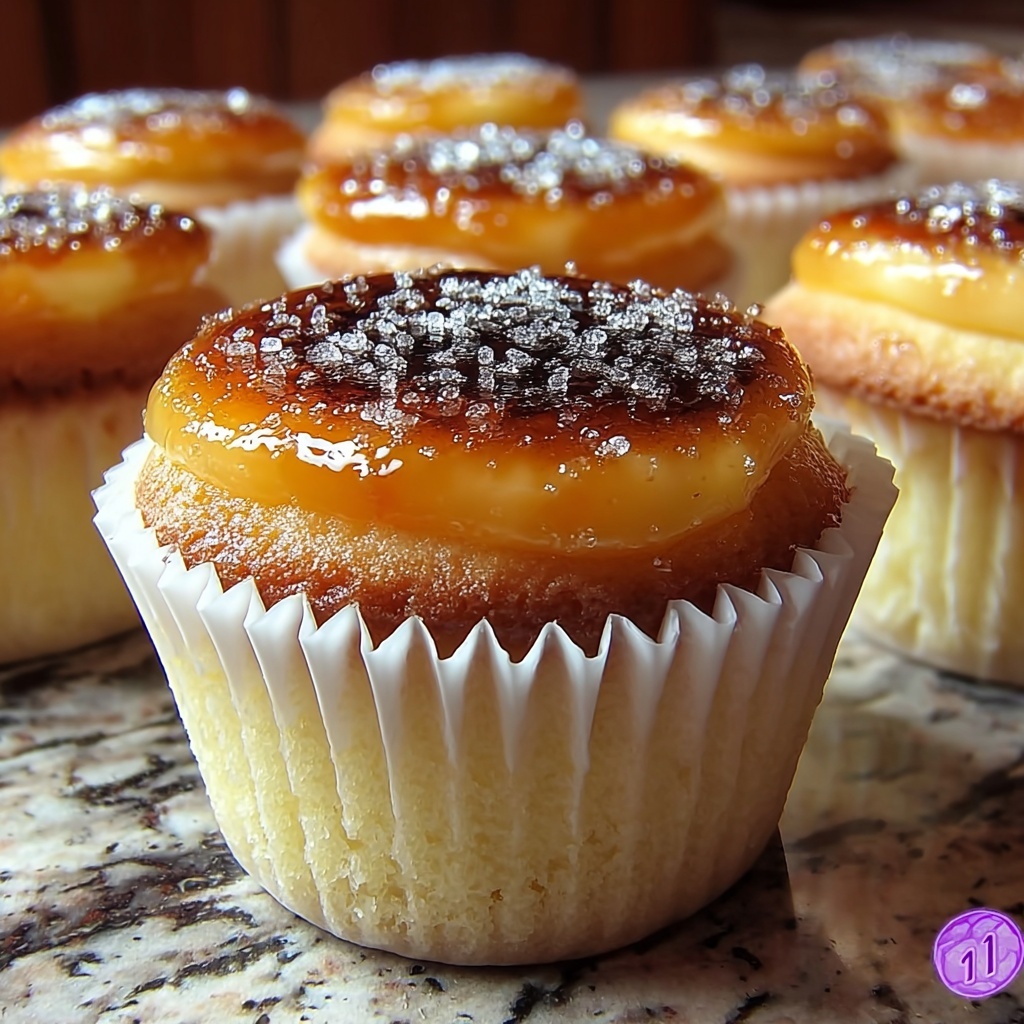
If you adore the creamy richness of cheesecake combined with the delicate charm of vanilla bean and a hint of crisp crème brûlée texture, then you are going to fall head over heels for this Vanilla Bean Crème Brûlée Cheesecake Cupcakes Recipe. These little cupcakes pack all the indulgence of a fancy dessert into perfectly portioned treats that are comforting yet elegant. Whether you’re making them for a special occasion or just because you deserve a decadent bite, these cupcakes offer a harmonious blend of buttery cake and smooth, luscious cheesecake with a sublime vanilla bean flavor that will have you savoring every crumb.
Ingredients You’ll Need
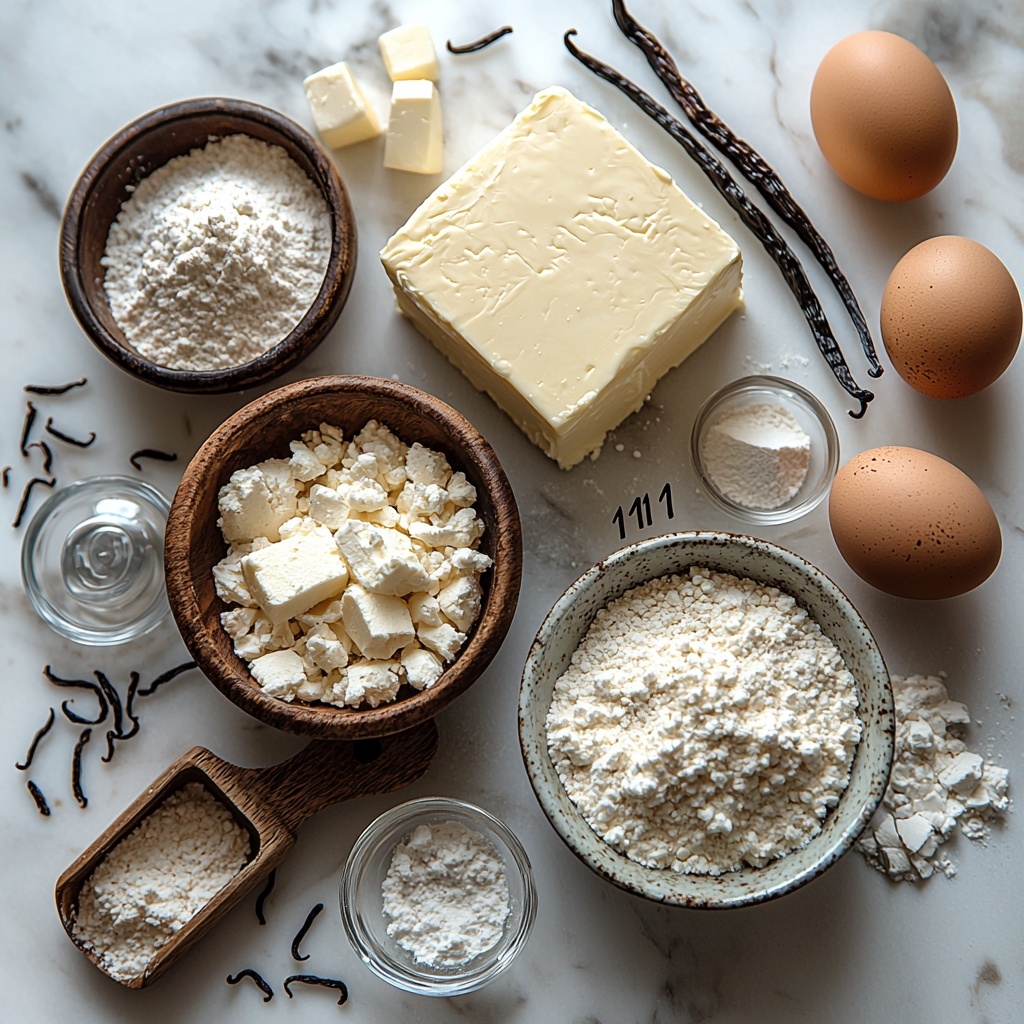
The magic of the Vanilla Bean Crème Brûlée Cheesecake Cupcakes Recipe lies in its simple but thoughtfully chosen ingredients. Each one plays a vital role in giving you that moist cupcake texture and irresistibly creamy cheesecake topping, rounded out by the distinct aroma of real vanilla bean.
- All-purpose flour: The base for the cupcakes, providing structure and tenderness.
- Granulated sugar (divided): Adds the perfect amount of sweetness, split between the cake and cheesecake layers to balance flavors.
- Baking powder: Helps the cupcakes rise beautifully with a light crumb.
- Baking soda: Works with the baking powder to ensure a soft, fluffy texture.
- Salt: Enhances and deepens the overall flavor profile.
- Unsalted butter (softened): Adds richness and moisture to the cupcake batter.
- Large eggs: Bind the ingredients together and create lift.
- Vanilla extract: Provides a warm, classic vanilla flavor essential in the cake component.
- Cream cheese (softened): The star of the cheesecake topping, giving it that silky smooth texture.
- Vanilla bean paste: Brings authentic vanilla bean flecks and an intense, aromatic flavor to the cheesecake layer.
How to Make Vanilla Bean Crème Brûlée Cheesecake Cupcakes Recipe
Step 1: Preheat the Oven
Start by preheating your oven to 350°F (175°C). This ensures that when your cupcakes go in, they bake evenly and rise perfectly, setting the stage for that tender cake texture we crave.
Step 2: Mix the Cupcake Batter
In your stand mixer, whisk together the all-purpose flour, half of the granulated sugar, baking powder, baking soda, and salt. Once combined, add the softened butter, eggs, and vanilla extract. Mix everything until silky smooth, which signals your batter is well blended without overmixing.
Step 3: Prepare the Cupcake Liners
Line your muffin tin with cupcake liners for easy release and better presentation. Spoon the cupcake batter into each liner until about two-thirds full — this gives the cupcakes room to rise without spilling over.
Step 4: Make the Cheesecake Filling
In a separate bowl, beat the softened cream cheese until smooth and fluffy. Gradually add the remaining sugar, then mix in the egg and vanilla bean paste. This luscious highlight of the recipe adds that dreamy texture and gorgeous vanilla bean speckles characteristic of crème brûlée.
Step 5: Add the Cheesecake Layer
Carefully spoon the cheesecake filling over each cupcake batter portion. This layering creates the perfect dual texture of fluffy cake below and creamy cheesecake on top.
Step 6: Bake to Perfection
Bake the cupcakes in the preheated oven for 20 to 25 minutes, or until a toothpick inserted in the center comes out clean. The combination of cake and cheesecake layers will set gently without cracking, showcasing beautiful creamy tops.
Step 7: Cool Before Serving
Allow your masterpiece cupcakes to cool completely. This step is crucial to let the cheesecake topping firm up a bit and to allow the flavors to meld, resulting in a divine eating experience.
How to Serve Vanilla Bean Crème Brûlée Cheesecake Cupcakes Recipe
Garnishes
Enhance your Vanilla Bean Crème Brûlée Cheesecake Cupcakes Recipe with a light caramelized sugar crust by sprinkling a thin layer of sugar on top and torching it until golden and crispy, mimicking classic crème brûlée. Fresh berries or a few edible flower petals can add a pop of color and freshness.
Side Dishes
Pair your cupcakes with a bright raspberry coulis or a dollop of lightly whipped cream to cut through the richness. A cup of aromatic coffee or a glass of chilled dessert wine complements the sweet, creamy flavors beautifully for an indulgent treat.
Creative Ways to Present
Serve these cupcakes on a rustic wooden board or vintage cake stand to amplify their charming allure. For a crowd-pleaser, arrange them in tiers and decorate with vanilla bean pods or fresh mint leaves to add sophistication and flair to your dessert table.
Make Ahead and Storage
Storing Leftovers
Keep any leftover Vanilla Bean Crème Brûlée Cheesecake Cupcakes Recipe in an airtight container in the refrigerator for up to 4 days. Chilling helps preserve freshness and texture, so you can enjoy them later at their very best.
Freezing
These cupcakes freeze well for longer storage. Wrap them individually in plastic wrap and place them in a freezer-safe container. They can stay frozen for up to 2 months. Thaw overnight in the fridge before serving to maintain their perfect consistency.
Reheating
If you prefer to enjoy a slightly warm cupcake, let them come to room temperature and then warm in the oven at 300°F (150°C) for 5–7 minutes. Avoid the microwave if possible, as it can soften the cheesecake texture too much.
FAQs
Can I use vanilla extract instead of vanilla bean paste?
While vanilla bean paste is preferred for its rich flavor and those tiny vanilla specks, you can substitute it with vanilla extract. Just note that you won’t get the same visual appeal or depth of flavor that the vanilla bean provides.
Do I need a special pan to make these cupcakes?
No special pans are needed beyond a standard muffin tin and cupcake liners. These tools make it easy to create uniform cupcakes and simplify cleanup.
What’s the best way to prevent cracks in the cheesecake top?
Be sure to mix the cheesecake filling just until smooth without overbeating, and don’t overbake. Letting the cupcakes cool gradually at room temperature also helps prevent cracking.
Can I make these cupcakes vegan or dairy-free?
This recipe relies heavily on cream cheese and butter for its characteristic taste and texture, so vegan or dairy-free adaptations would require alternative ingredients like non-dairy cream cheese and margarine. These substitutions might affect the texture and taste, so it may take some experimentation.
How long do these cupcakes last at room temperature?
Because of the cream cheese topping, it’s best not to leave these cupcakes out at room temperature for more than two hours. Refrigerate them promptly to maintain freshness and safety.
Final Thoughts
Now that you have this fabulous Vanilla Bean Crème Brûlée Cheesecake Cupcakes Recipe in your baking arsenal, I guarantee it will become your go-to for impressing friends and family with minimal fuss and maximum flavor. These cupcakes strike the perfect balance between comforting and elegant, creamy and fluffy, with a sweet vanilla twist that truly brightens each bite. So go ahead, treat yourself to a batch, and watch these delightful cupcakes disappear in no time!
Print
Vanilla Bean Crème Brûlée Cheesecake Cupcakes Recipe
- Prep Time: 20 minutes
- Cook Time: 25 minutes
- Total Time: 45 minutes
- Yield: 12 cupcakes
- Category: Dessert
- Method: Baking
- Cuisine: American
Description
These Vanilla Bean Crème Brûlée Cheesecake Cupcakes combine the rich, creamy texture of cheesecake with the delightful vanilla bean flavor and a soft cupcake base. Perfectly portioned for individual servings, they offer a luscious dessert experience with a smooth cream cheese filling infused with vanilla bean paste, baked to perfection in a cupcake form.
Ingredients
Cupcake Batter
- 1 cup all-purpose flour
- 1/2 cup granulated sugar (divided)
- 1/2 teaspoon baking powder
- 1/4 teaspoon baking soda
- 1/4 teaspoon salt
- 1/2 cup unsalted butter, softened
- 2 large eggs
- 2 teaspoons vanilla extract
Cheesecake Filling
- 8 oz cream cheese, softened
- 1/2 cup granulated sugar (remaining from the divided sugar)
- 1 large egg
- 1 tablespoon vanilla bean paste
Instructions
- Preheat Oven: Preheat your oven to 350°F (175°C) to ensure it reaches the ideal temperature for baking the cupcakes evenly.
- Prepare Batter: In a stand mixer bowl, combine the dry ingredients—flour, 1/2 cup sugar, baking powder, baking soda, and salt. Add the softened butter, eggs, and vanilla extract, mixing until the batter is smooth and homogeneous.
- Fill Cupcake Liners: Line a muffin tin with cupcake liners. Fill each liner about two-thirds full with the prepared cupcake batter to allow space for the cheesecake filling.
- Make Cheesecake Filling: In a separate bowl, beat the softened cream cheese until creamy and smooth. Gradually add the remaining sugar and mix well. Incorporate one egg and vanilla bean paste, continuing to beat until fully combined and smooth.
- Add Cheesecake Layer: Spoon the cheesecake mixture on top of the cupcake batter in each liner, ensuring a nice layer for the creamy texture inside.
- Bake: Bake in the preheated oven for 20 to 25 minutes, or until a toothpick inserted into the cupcake part comes out clean, indicating doneness without overbaking the cheesecake.
- Cool: Remove the cupcakes from the oven and allow them to cool completely before serving, ensuring the cheesecake filling sets properly and flavors meld.
Notes
- Ensure cream cheese and butter are softened for a smoother batter and filling.
- Use a toothpick to test the cake layer doneness but avoid overbaking to keep the cheesecake moist.
- For an extra touch, sprinkle sugar on top and caramelize with a kitchen torch to mimic the classic crème brûlée crust.
- Store leftovers in the refrigerator and consume within 3-4 days for best flavor and freshness.
