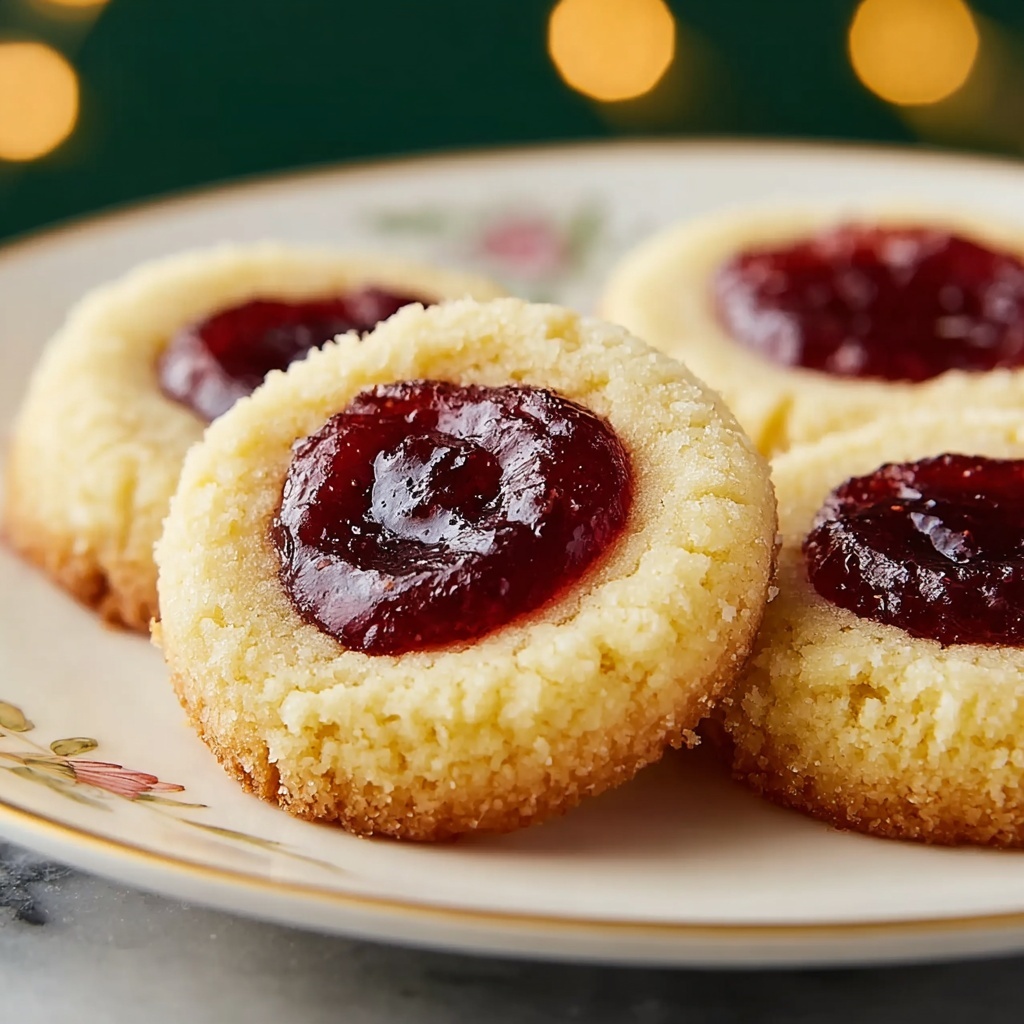
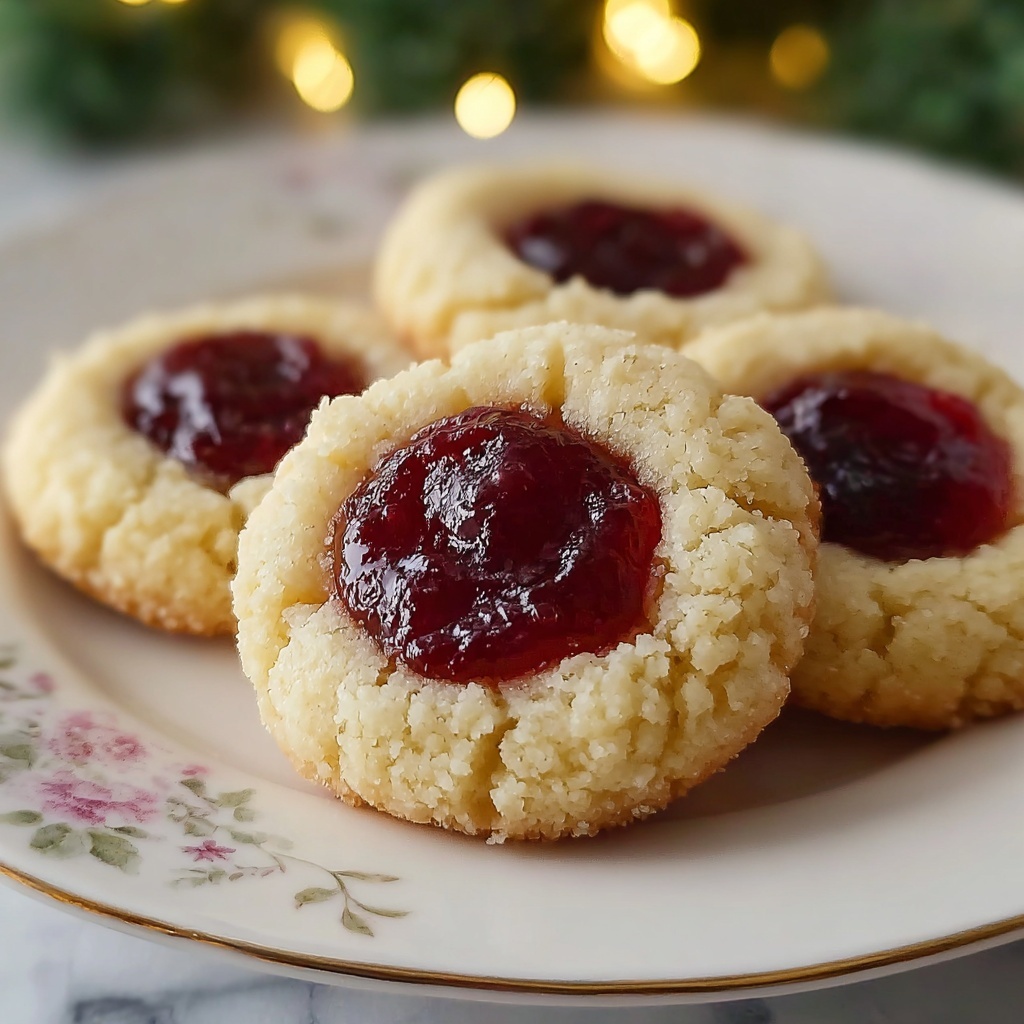
If there’s one cookie that truly feels like a warm hug during the holidays, it’s the Best Christmas Thumbprint Cookies to Spread Holiday Joy Recipe. These charming little delights are bursting with buttery goodness and a jewel-toned jam center that instantly brings festive cheer to any gathering. Whether you’re baking up a batch for your family or gifting them to friends, these cookies offer a perfect balance of soft, crumbly texture and a sweet, fruity pop that makes every bite unforgettable. Trust me, once you try this recipe, it will become your go-to holiday tradition!
Ingredients You’ll Need
The beauty of this recipe lies in its simple, wholesome ingredients that come together to create magic. Each component plays a crucial role, from the rich, creamy butter that gives the cookies their tender crumb, to the vibrant jam that adds that festive burst of color and flavor.
- 1 cup salted butter (softened): Provides a rich, creamy base and keeps cookies tender.
- 1 cup granulated sugar (or coconut sugar): Sweetens perfectly while adding a slight crunch to the cookie’s surface.
- 1/2 teaspoon baking powder: Helps the cookies rise just enough for a light texture without losing shape.
- 1 large egg: Binds the ingredients and adds moisture for the perfect chew.
- 2 teaspoons pure vanilla extract: Infuses the dough with warm, aromatic flavor.
- 2 1/2 cups all-purpose flour (or gluten-free alternative): Creates the sturdy yet soft structure of the cookie.
- 1 cup jam (any favorite variety): The star ingredient for that classic thumbprint look and festive fruity sweetness.
How to Make Best Christmas Thumbprint Cookies to Spread Holiday Joy Recipe
Step 1: Preheat Your Oven
Begin by heating your oven to 325°F (165°C). Preheating ensures the cookies bake evenly—essential for achieving that perfect golden edge with a soft center.
Step 2: Cream the Butter, Sugar, and Baking Powder
Use a stand mixer or hand mixer to beat softened butter, sugar, and baking powder together until light and fluffy, about 3 to 4 minutes. This step aerates the dough, giving your cookies a tender, melt-in-your-mouth texture.
Step 3: Add Egg and Vanilla
Next, mix in the large egg and pure vanilla extract until the batter is smooth and fully blended. These ingredients add moisture and depth of flavor, making each cookie feel like a festive celebration in every bite.
Step 4: Incorporate the Flour
Slowly add the flour on the lowest mixer speed just until the dough comes together. Be careful not to overmix; overworking the dough can make the cookies tough, and nobody wants that during the holidays!
Step 5: Chill the Dough
Wrap your dough or cover the mixing bowl and refrigerate for at least 30 minutes. Chilling firms up the dough, making it easier to roll and helping maintain the cookie’s shape while baking.
Step 6: Shape the Cookies
Roll the chilled dough into 1-inch balls and place them on a baking sheet, spacing them at least 1 inch apart to allow room for gentle spreading during baking.
Step 7: Make the Thumbprint
Press your thumb or the rounded end of a spoon into the center of each dough ball to create a small well. This is where the magic jam filling goes, so aim for a nice, cozy little pocket.
Step 8: Fill with Jam
Spoon about 1/2 teaspoon of your favorite jam into each indentation. Avoid overfilling to keep the jam from spilling over the sides while baking.
Step 9: Bake
Pop your tray into the oven and bake for 18 to 20 minutes. You’ll know they’re ready when the bottoms turn a lovely light golden brown—watch closely so they don’t overbake.
Step 10: Cool and Enjoy
Let the cookies cool on the baking sheet for a few minutes to firm up, then transfer them to a wire rack to cool completely. This final step highlights their crumbly-perfect texture, ready for savoring or sharing!
How to Serve Best Christmas Thumbprint Cookies to Spread Holiday Joy Recipe

Garnishes
For an extra festive touch, dust a light sprinkle of powdered sugar over the cookies before serving. You can also add a small fresh mint leaf or a few edible silver sprinkles around the jam for that holiday sparkle that dazzles guests.
Side Dishes
These thumbprint cookies pair beautifully with a hot cup of mulled cider or spiced tea, creating a warm and inviting holiday snack experience. They also complement cheeses like mild Brie or a sharp cheddar on a festive cheese board.
Creative Ways to Present
Arrange these cookies in a circular pattern around a small bowl of fresh jam for a rustic holiday centerpiece. Packaging them in decorative tins or clear cellophane bags tied with red and green ribbons also makes them perfect gifts to spread holiday joy far and wide.
Make Ahead and Storage
Storing Leftovers
Store your Best Christmas Thumbprint Cookies to Spread Holiday Joy Recipe in an airtight container at room temperature for up to a week. This keeps them fresh and chewy without losing their delightful jammed centers.
Freezing
If you wish to prepare ahead, freeze the unbaked dough balls after forming the thumbprints. When ready to bake, just add a minute or two to the baking time and enjoy fresh cookies anytime during the season.
Reheating
For a warm, freshly baked feel, gently reheat the cookies in a 300°F oven for about 5 minutes. Avoid microwaving as it can melt the jam and make the cookies soggy.
FAQs
Can I use any type of jam for this Best Christmas Thumbprint Cookies to Spread Holiday Joy Recipe?
Absolutely! Feel free to experiment with your favorites like raspberry, apricot, or even a festive cranberry-orange jam to add your own signature twist to the cookies.
Is it possible to make these cookies gluten-free?
Yes! Simply swap the all-purpose flour for a gluten-free blend that’s suitable for baking. The texture might be slightly different but just as delicious and joyful.
Why is chilling the dough important?
Chilling firms up the dough, making it easier to handle and helping the cookies hold their shape during baking, which is key to a perfect thumbprint cookie.
How do I prevent the jam from overflowing during baking?
Use just a small amount of jam—about a half teaspoon—and avoid overfilling the wells. This keeps the jam centered as it bakes and prevents a sticky mess.
Can I make these cookies ahead of time?
Definitely! You can prepare the dough or even fully bake the cookies ahead and store or freeze them. They’re just as delightful when enjoyed fresh or after some storage.
Final Thoughts
There’s nothing quite like the joy of baking the Best Christmas Thumbprint Cookies to Spread Holiday Joy Recipe and sharing those precious moments with loved ones. The perfect bite of buttery dough and sweet jam evokes nostalgia and warmth that perfectly match the spirit of the season. I truly hope you try this recipe and make these cookies a beloved holiday tradition in your home. Happy baking and happy holidays!
Print
Best Christmas Thumbprint Cookies to Spread Holiday Joy Recipe
- Prep Time: 15 minutes
- Cook Time: 20 minutes
- Total Time: 35 minutes plus 30 minutes chilling
- Yield: 50 cookies
- Category: Dessert
- Method: Baking
- Cuisine: American
Description
These Best Christmas Thumbprint Cookies are a delightful holiday treat featuring a buttery, soft cookie base crowned with a sweet, fruity jam center. Perfect for spreading holiday joy, these cookies are easy to make, bake to a tender, melt-in-your-mouth texture, and can be customized with your favorite jam flavors to suit any festive occasion.
Ingredients
Cookie Dough
- 1 cup salted butter (softened)
- 1 cup granulated sugar (or coconut sugar)
- 1/2 teaspoon baking powder
- 1 large egg
- 2 teaspoons pure vanilla extract
- 2 1/2 cups all-purpose flour (or gluten-free alternative)
Filling
- 1 cup jam (any favorite variety)
Instructions
- Preheat Oven: Preheat your oven to 325°F (165°C) to prepare for baking the cookies.
- Mix Butter and Sugar: In a stand mixer, beat together softened butter, granulated sugar, and baking powder until light and fluffy, approximately 3-4 minutes. This step ensures a delicate and airy cookie texture.
- Add Egg and Vanilla: Add the large egg and pure vanilla extract to the butter mixture, mixing until fully blended and the batter is smooth and homogeneous.
- Incorporate Flour: Gradually add all-purpose flour on low speed, mixing just until combined to avoid overworking the dough which would toughen the cookies.
- Chill Dough: Cover the dough and refrigerate for at least 30 minutes to firm it up, making it easier to handle and enhancing flavor.
- Form Dough Balls: Roll the chilled dough into 1-inch balls and place them on a baking sheet, ensuring at least 1 inch spacing between each ball to allow for slight spreading.
- Create Indentations: Use your thumb or a rounded tool to press a small well into the center of every dough ball; this will hold the jam filling.
- Fill with Jam: Spoon approximately 1/2 teaspoon of your favorite jam into each indentation carefully, avoiding overfilling that could cause spills during baking.
- Bake: Place the cookie sheet in the preheated oven and bake for 18-20 minutes, or until the bottoms are lightly golden, indicating they are perfectly baked.
- Cool Cookies: Allow the cookies to cool on the baking sheet for a few minutes to set, then transfer them to a wire rack to cool completely before serving or storing.
Notes
- You can easily swap granulated sugar for coconut sugar for a different flavor profile and a less refined option.
- Choosing a gluten-free flour blend lets you accommodate gluten sensitivities without losing texture.
- Use your favorite jams such as raspberry, strawberry, apricot, or even marmalade for unique twists.
- Refrigeration of the dough is vital to prevent spreading and to develop the flavor.
- If you prefer a crisper cookie, bake a few minutes longer but watch carefully to avoid overbaking.
- Store the cookies in an airtight container at room temperature for up to one week or freeze for longer storage.

