
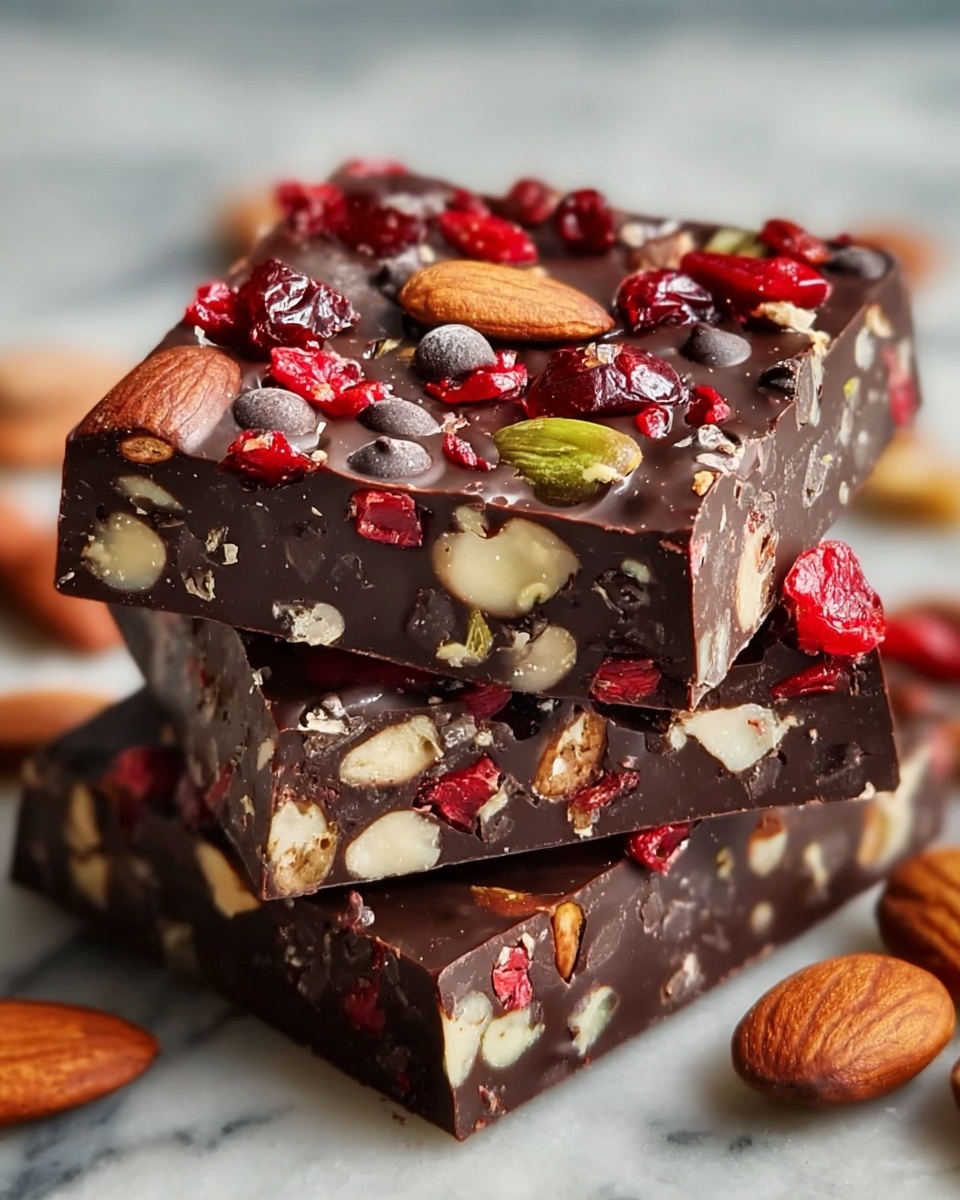
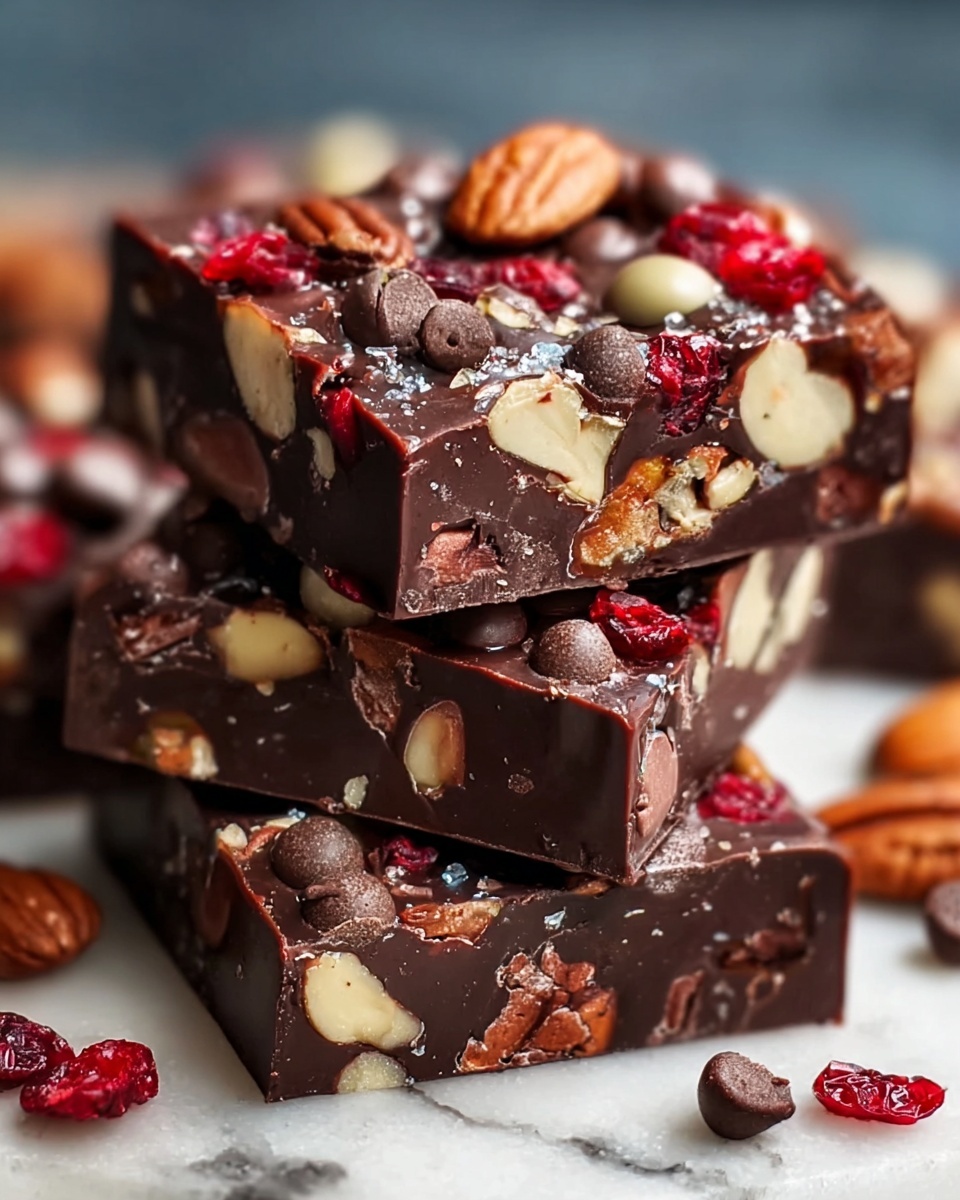
If you love a snack that perfectly balances rich chocolate with the natural sweetness and crunch of dried fruit and nuts, you are going to adore this Chocolate Fruit and Nut Bars Recipe. These bars are wonderfully simple to make yet deliver a satisfying blend of textures and flavors that feel indulgent without being complicated. Whether you need a quick energy boost, a delicious treat to pack in lunches, or a lovely homemade gift, this recipe hits all the right notes with wholesome ingredients that come together beautifully.
Ingredients You’ll Need
Gathering these ingredients is a breeze, and each one plays a starring role in the delightful taste and texture of your bars. From the smooth richness of chocolate to the sweet chewiness of fruit and the nutty crunch, every component adds a little magic.
- Dark chocolate chips: The base of the bars, offering a deep, luscious chocolate flavor that holds everything together.
- Dried cranberries: Add a tangy sweetness and chewy texture, which you can swap with raisins, apricots, or your favorite dried fruits.
- Unsalted almonds: Provide a satisfying crunch and a mild nutty flavor; feel free to substitute with walnuts, cashews, or pecans.
- Sunflower seeds: Optional, but they offer an extra layer of crunch and subtle earthiness.
- Shredded coconut: Also optional, this gives a lovely texture and a hint of tropical flavor.
- Honey or maple syrup: A touch of natural sweetness to balance the deep chocolate and fruit notes.
- Vanilla extract: Enhances the overall flavor with warm, aromatic undertones.
- Pinch of sea salt: Complements and balances the sweetness, making every bite pop.
How to Make Chocolate Fruit and Nut Bars Recipe
Step 1: Melt the Chocolate
Start by gently melting the dark chocolate chips in a microwave-safe bowl or over a double boiler. Stir it frequently to ensure a smooth, glossy texture without any burnt spots. This silky chocolate base will help bind your bars together while delivering that decadent chocolate flavor you crave.
Step 2: Prepare the Fruit and Nuts
While the chocolate melts, chop the almonds into bite-sized pieces and measure out your dried cranberries or fruit of choice. If you’re including optional ingredients like sunflower seeds and shredded coconut, have them ready to go as well. This prep keeps everything moving smoothly when the chocolate is ready.
Step 3: Mix Everything Together
Pour the melted chocolate into a large mixing bowl, then add your dried fruits, nuts, sunflower seeds, and shredded coconut. Stir gently but thoroughly to ensure every piece is coated with luscious chocolate. Add the honey or maple syrup, vanilla extract, and a pinch of sea salt to round out the flavors. This step is where all your ingredients blend into a harmonious mix full of texture and taste.
Step 4: Form the Bars
Line a baking dish with parchment paper and pour in your chocolate and fruit-nut mixture. Spread it out evenly using a spatula, then press down gently but firmly to compact the mixture. This helps the bars hold together well once set, so they slice neatly and won’t crumble.
Step 5: Set the Bars
Place the dish in the refrigerator for at least an hour or until the bars are firm to the touch. This waiting time is crucial for the chocolate to harden and the bars to become perfectly sliceable.
Step 6: Cut into Bars
Once chilled, remove the set chocolate block from the baking dish and lift the parchment paper out. Using a sharp knife, cut into bars or squares of your preferred size. These bars are easy to customize whether you like bite-sized pieces or larger portions as an on-the-go snack.
Step 7: Serve and Store
Enjoy your Chocolate Fruit and Nut Bars right away or wrap them individually in parchment or plastic wrap. They are perfect for packed lunches, pantry snacks, or even a thoughtful homemade gift for friends and family.
How to Serve Chocolate Fruit and Nut Bars Recipe
Garnishes
While the bars shine on their own, adding a light dusting of cocoa powder or a few extra chopped nuts on top before chilling can elevate their presentation and add a subtle flair of texture. Sprinkling a tiny pinch of flaky sea salt just before serving brings out the chocolate’s boldness beautifully.
Side Dishes
These bars pair wonderfully with fresh fruit like berries or sliced apples for a refreshing contrast. A cup of herbal tea or a chilled glass of almond milk complements the bars nicely, making your snack feel like a mini indulgent moment.
Creative Ways to Present
Wrap individual bars in colorful parchment paper tied with twine for a rustic, charming look perfect for gifting. For parties, arrange them on a wooden board with nuts, fruit, and small bowls of extra chocolate chips or honey for a self-serve snack station that friends will adore.
Make Ahead and Storage
Storing Leftovers
Keep any leftover Chocolate Fruit and Nut Bars in an airtight container at room temperature for up to 4 days, or refrigerate to extend their freshness. They stay deliciously chewy and crunchy, making them ready whenever snack cravings strike.
Freezing
If you want to make these bars way ahead of time, they freeze beautifully! Wrap each bar individually and place them in a freezer-safe container or bag. Frozen bars last for up to 3 months and thaw quickly at room temperature.
Reheating
These bars are best enjoyed chilled or at room temperature. If you prefer a slightly softer texture, allow them to sit at room temperature for about 10 minutes before indulging, but avoid microwaving as the chocolate can melt too quickly and become messy.
FAQs
Can I use milk chocolate instead of dark chocolate?
Absolutely! Milk chocolate works wonderfully if you prefer a sweeter taste, just keep in mind the bars will be a bit less intense in chocolate flavor but still delicious and satisfying.
Are these bars gluten-free?
Yes, as long as you use gluten-free ingredients like certified chocolate chips and ensure your dried fruits and nuts are not processed with gluten-containing products, this recipe is naturally gluten-free.
Can I substitute the nuts or dried fruit?
Definitely! The beauty of this recipe is its flexibility. Swap almonds for walnuts, pecans, or cashews, and try raisins, apricots, or even chopped dates instead of cranberries. Just choose what you love or have on hand.
Is it necessary to refrigerate the bars after making them?
Refrigeration helps the bars firm up nicely and keeps them fresh longer. However, if your kitchen is cool, you can store them in an airtight container at room temperature for a few days, but chilling is recommended for the best texture.
Can I add other mix-ins, like seeds or spices?
Yes! Feel free to experiment by adding chia seeds, flaxseeds, pumpkin seeds, or a pinch of cinnamon or nutmeg to give your bars extra personality and nutrition.
Final Thoughts
If you haven’t yet tried this wonderful Chocolate Fruit and Nut Bars Recipe, you’re seriously missing out on a snack that combines ease, flavor, and wholesome goodness in every bite. Give it a go and watch how it becomes a treasured favorite in your kitchen and snack drawer. Happy baking and even happier snacking!
Print
Chocolate Fruit and Nut Bars Recipe
- Prep Time: 10 minutes
- Cook Time: 0 minutes
- Total Time: 2 hours 10 minutes
- Yield: 8 servings
- Category: Snack
- Method: No-Cook
- Cuisine: American
- Diet: Vegetarian
Description
These Chocolate Fruit and Nut Bars are a delicious and versatile no-bake treat that combines rich dark chocolate with a mix of dried fruits, nuts, and optional seeds and coconut. Perfect as a healthy snack or a sweet treat, they are easy to prepare and customizable to your taste preferences.
Ingredients
Chocolate Base
- 1 cup dark chocolate chips (or milk chocolate for a sweeter option)
Fruit and Nuts
- 1/2 cup dried cranberries (or raisins, apricots, or any dried fruit of choice)
- 1/2 cup unsalted almonds, chopped (or any nuts like walnuts, cashews, or pecans)
Optional Add-ins
- 1/2 cup sunflower seeds (optional, for extra crunch)
- 1/2 cup shredded coconut (optional, for extra texture and flavor)
- 1 tablespoon honey or maple syrup (optional, for added sweetness)
- 1/4 teaspoon vanilla extract (optional, for extra flavor)
- Pinch of sea salt (optional, for balancing sweetness)
Instructions
- Melt the Chocolate:
Gently melt the dark chocolate chips in a heatproof bowl over a pot of simmering water or in short bursts in the microwave, stirring frequently until smooth and fully melted.
- Prepare the Fruit and Nuts:
Chop the unsalted almonds and any other chosen nuts into small pieces. Measure out dried cranberries or your dried fruit of choice.
- Prepare Optional Ingredients:
If using, have the sunflower seeds and shredded coconut ready to add. These ingredients add extra crunch and flavor.
- Mix Everything Together:
In a large bowl, combine the melted chocolate, dried fruit, chopped nuts, sunflower seeds, shredded coconut, honey or maple syrup, vanilla extract, and a pinch of sea salt if using. Stir thoroughly to ensure all ingredients are evenly coated with chocolate.
- Form the Bars:
Pour the chocolate mixture into a prepared dish lined with parchment paper (an 8×8 inch square pan works well). Spread the mixture evenly using a spatula and press down gently to compact it, helping the bars stick together.
- Set the Bars:
Place the dish in the refrigerator and let it chill for at least 2 hours or until the chocolate is firm and set.
- Cut into Bars:
Once set, remove the block from the dish using the parchment paper. Using a sharp knife, cut into bars or squares of your desired size.
- Serve and Store:
Serve immediately or wrap bars individually for grab-and-go snacks. Store leftovers in an airtight container in the refrigerator for up to one week.
Notes
- You can customize these bars by substituting any dried fruits or nuts you prefer.
- For a vegan option, use maple syrup instead of honey and choose vegan chocolate chips.
- Pressing the bars firmly helps them hold together better.
- Chilling time can be extended if you prefer firmer bars.
- These bars make for a great portable snack for kids and adults alike.


