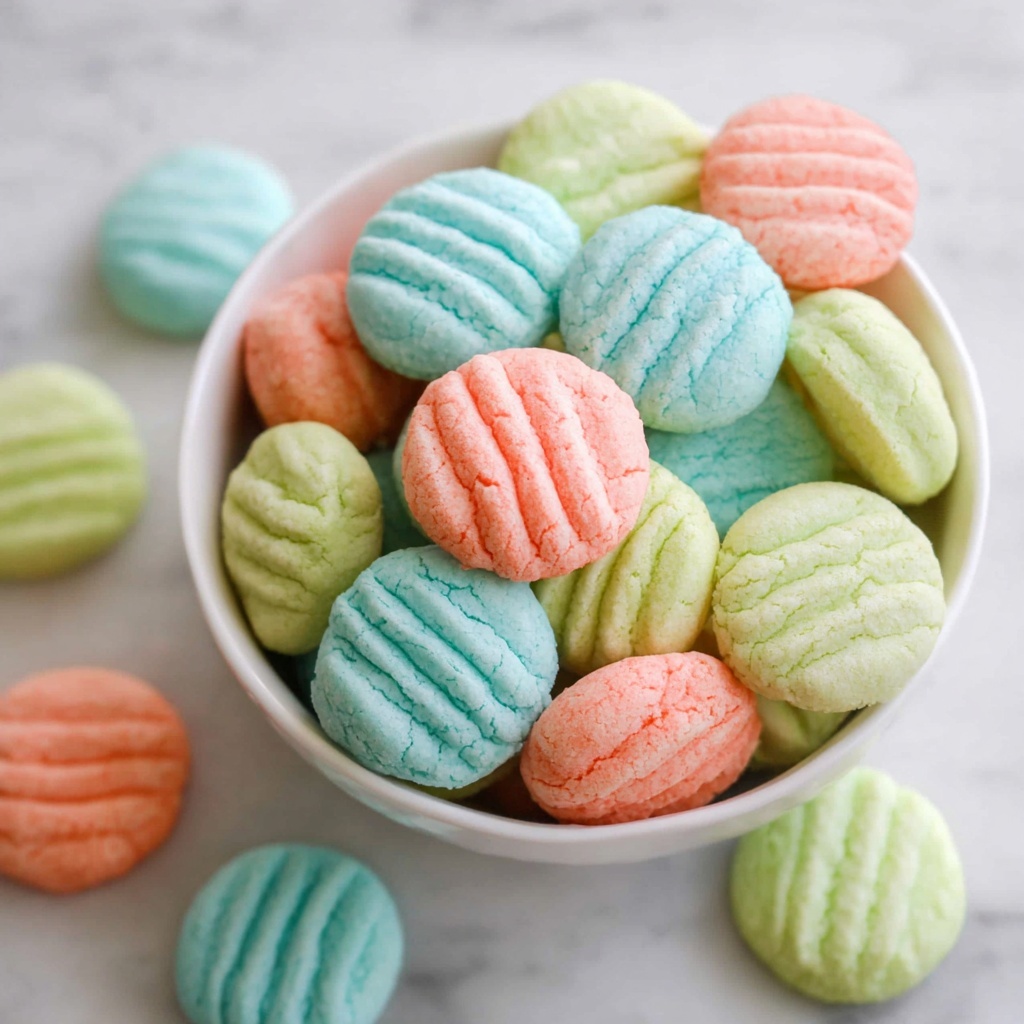
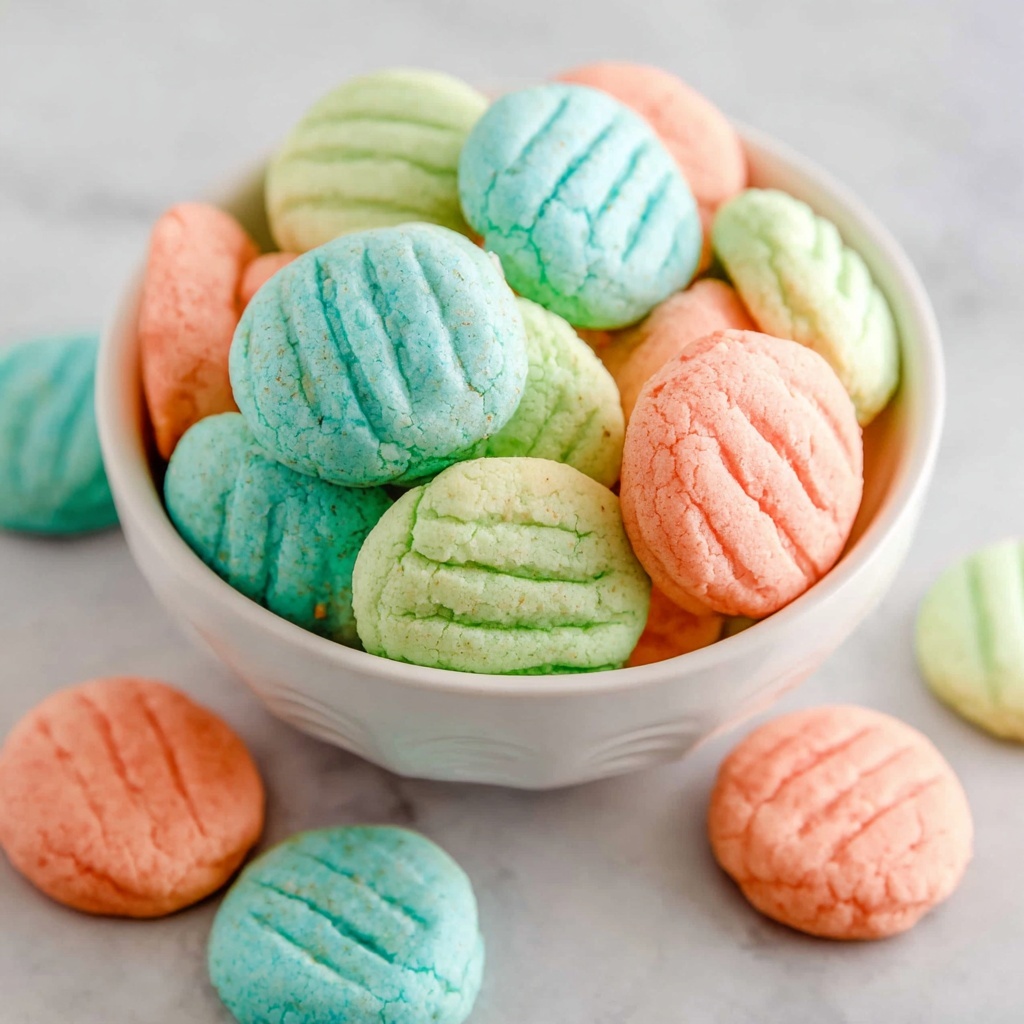
If you’re looking for a delightful little treat that melts in your mouth with a perfect balance of sweet and minty freshness, then you have to try this Cream Cheese Mints Recipe. These vibrant, smooth, and creamy bites are incredibly easy to make and bring a nostalgic charm to any gathering, holiday, or just an everyday treat. The combination of cream cheese, peppermint, and a touch of vanilla creates an irresistible flavor profile that’s light but undeniably addictive, making it a handmade favorite that never disappoints.
Ingredients You’ll Need
Getting the ingredients right is half the joy of making Cream Cheese Mints Recipe. Each component plays a crucial role — from the rich cream cheese that gives the mints their signature creaminess to the powdered sugar that sweetens and firms up the texture. Plus, the peppermint and vanilla extracts bring in those classic refreshing notes you’ll love.
- Cream cheese: Use 8 ounces at room temperature for smooth blending and rich flavor.
- Unsalted butter: 2 tablespoons, also softened, to add creaminess and balance the texture.
- Kosher salt: Just ½ teaspoon to enhance all the flavors without overpowering.
- Pure peppermint extract: ½ teaspoon for that unmistakable cool minty kick.
- Pure vanilla extract: ½ teaspoon to add a subtle, warm undertone that complements the mint.
- Powdered sugar: 2 pounds, plus extra for dusting, to sweeten and develop the perfect consistency.
- Food coloring: A few drops of red, blue, or green to make these mints as fun and festive as you like.
How to Make Cream Cheese Mints Recipe
Step 1: Cream Together the Bases
Start by beating the cream cheese, butter, kosher salt, peppermint, and vanilla extracts together in a large bowl with a hand mixer. This step is essential because it ensures a super smooth and homogenous base, making the texture of your mints perfectly creamy and light.
Step 2: Incorporate the Powdered Sugar
Add in the powdered sugar gradually, about a half cup at a time, mixing thoroughly after each addition. The goal here is to reach a dough that feels like play-doh — dense but soft enough to easily shape without sticking to your hands excessively. You might find you don’t need the full two pounds, so keep an eye on the consistency.
Step 3: Divide and Color Your Dough
Once your dough is ready, divide it equally into three bowls, roughly 389 grams per serving. Now it’s time to get creative! Add 1 or 2 drops of your chosen food coloring into each bowl and mix until the color is evenly distributed. This adds a festive flair and makes the mints stand out on any platter.
Step 4: Chill the Dough
Place the colored dough in the refrigerator for at least 30 minutes. Chilling firms up the mixture, making it much easier to handle when forming the mints. Trust me, this little pause is a game-changer for smooth shaping.
Step 5: Shape Your Mints
Using a teaspoon, scoop out portions and roll them between your palms to form small, smooth balls. Line them up on a parchment-lined baking sheet, ready for their signature fork imprint.
Step 6: Add the Classic Fork Imprint
Dip a fork into powdered sugar to prevent sticking, then gently press down on each mint ball to flatten slightly and leave that iconic fork-striped pattern. This not only looks charming but helps the mints dry evenly.
Step 7: Let Them Dry
Leave the mints on the pan to dry for a few hours at room temperature. This step is key to letting the outer layer harden just enough without losing the creamy center. Once dry, transfer them to an airtight container and store in the refrigerator.
How to Serve Cream Cheese Mints Recipe

Garnishes
While these mints are beautiful on their own, you can sprinkle a tiny pinch of edible glitter or finely chopped fresh mint leaves for an extra special touch. A light dusting of additional powdered sugar right before serving can make them look like little snowy treasures, perfect for winter holidays or elegant dinner parties.
Side Dishes
Cream Cheese Mints Recipe pairs wonderfully with coffee or tea, making them a charming companion for your afternoon break. They also work beautifully alongside dessert plates, especially rich chocolate cakes or pies, as their refreshing mintiness balances sweetness perfectly.
Creative Ways to Present
Why not arrange these colorful mints in a decorative bowl for a centerpiece at your next gathering? You can also wrap individual mints in wax paper and tie them with a ribbon for sweet homemade party favors. Another fun idea is to stack the mints in clear jars or layer them by color for a stunning visual effect.
Make Ahead and Storage
Storing Leftovers
If you’re lucky enough to have leftovers, store your mints in an airtight container in the refrigerator. They will keep beautifully for up to two weeks, maintaining their creamy texture and fresh flavor, ready for whenever a minty craving strikes.
Freezing
For longer storage, these mints freeze well. Place them in a single layer on parchment paper in a freezer-safe container, separating layers with wax paper to avoid sticking. They can keep for up to three months. When ready to enjoy, just allow them to thaw in the fridge before serving.
Reheating
Because these are no-bake treats, “reheating” isn’t necessary or recommended. Just bring them out of the fridge or freezer and let them come to a pleasant cool room temperature or enjoy them chilled for a refreshing bite anytime.
FAQs
Can I substitute butter with margarine in this Cream Cheese Mints Recipe?
While margarine might work in a pinch, using real unsalted butter will give you the best flavor and texture. Butter contributes a richness and smoothness that margarine can’t quite replicate.
What if I don’t have peppermint extract? Can I use peppermint oil?
Peppermint oil is much stronger than extract, so only use a tiny drop if you decide to substitute. Otherwise, vanilla extract can add flavor, but the classic minty freshness might be less pronounced.
How do I know when the dough has the right consistency?
The dough should feel like play-doh — firm enough to hold a shape but soft enough to roll without cracking. If it’s too sticky, add a little more powdered sugar; if too dry, a small dab of cream cheese can bring it back.
Can I make these mints without food coloring?
Absolutely! The food coloring is purely optional to add some fun and festivity, but the mints will taste just as wonderful in their natural creamy white color.
Why do I need to let the mints dry before storing?
Giving the mints time to dry allows the outer layer to set slightly, which prevents them from sticking together in the container and helps maintain their classic texture when you bite into them.
Final Thoughts
Making this Cream Cheese Mints Recipe is such a rewarding and fun experience, especially because the result is a batch of charming, flavorful mints that feel like a hug wrapped in every bite. Whether you’re making them for a special occasion, gifting them to friends, or just wanting a sweet minty pick-me-up, these mints never fail to impress. I promise once you try this recipe, it’ll become one of your new favorite homemade treats to share again and again.
Print
Cream Cheese Mints Recipe
- Prep Time: 45 minutes
- Cook Time: 0 minutes
- Total Time: 45 minutes
- Yield: 105 mints
- Category: Candy
- Method: No-Cook
- Cuisine: American
- Diet: Vegetarian
Description
Cream Cheese Mints are a delightful no-bake treat combining smooth cream cheese, butter, and peppermint flavor with a hint of vanilla, sweetened with powdered sugar and colored for festive appeal. These bite-sized mints are easy to make, requiring no cooking, and are perfect for holiday gatherings or as a refreshing sweet snack.
Ingredients
Main Ingredients
- 8 ounces cream cheese (227 grams, room temperature – 1 brick)
- 2 tablespoons unsalted butter (28 grams, room temperature – ¼ stick)
- ½ teaspoon kosher salt
- ½ teaspoon pure peppermint extract (2 grams)
- ½ teaspoon pure vanilla extract (2 grams)
- 2 pounds powdered sugar (908 grams, plus more for dipping)
- Food coloring (red, blue, and/or green)
Instructions
- Beat Cream Cheese Mixture: In a large bowl, use a hand mixer to beat the cream cheese, butter, salt, and peppermint and vanilla extracts together until the mixture is smooth and creamy.
- Add Powdered Sugar: Gradually add powdered sugar, about ½ cup at a time, mixing well after each addition until the mixture reaches a play-doh-like consistency; you may not need all the powdered sugar.
- Divide Dough: Split the dough equally among three separate bowls, approximately 389 grams per bowl.
- Color the Dough: Add 1–2 drops of food coloring to each bowl and mix thoroughly to incorporate the color evenly.
- Chill Dough: Refrigerate the colored dough for at least 30 minutes to firm it up and make it easier to handle.
- Form Mints: Using a teaspoon, scoop out portions of dough and roll them into small balls with your hands. Place these balls on a parchment-lined baking sheet.
- Shape with Fork: Dip a fork into powdered sugar and gently press down on each mint ball to create a textured indentation.
- Dry Mints: Allow the mints to dry on the sheet for a few hours to firm up, then transfer them to an airtight container and store in the refrigerator.
Notes
- Ensure cream cheese and butter are at room temperature for easy mixing.
- Adjust powdered sugar quantity as needed to achieve the desired dough consistency.
- Use parchment paper on the baking sheet to prevent sticking.
- Allow enough drying time for mints to firm up before storing.
- Store the mints in an airtight container in the refrigerator for optimal freshness.
- Customize colors using food coloring to suit any occasion.


