If you have ever thought that making your own pie crust was too complicated or that gluten-free baking meant sacrificing flavor and texture, this Homemade Gluten-Free Pie Crust Recipe is here to change your mind. Imagine a buttery, flaky crust that holds up beautifully under any filling, whether sweet or savory, and gives you the confidence that everything on your plate is gluten-free and made from scratch. This recipe is simple, approachable, and uses everyday ingredients that come together to create a pie crust that feels like a warm hug in every bite.
Ingredients You’ll Need
You’ll love how straightforward this recipe is—the ingredients are minimal but absolutely essential to achieving that perfect balance of crumbly, tender, and rich. Each one plays a key role in the crust’s color, texture, and flavor.
- 1 cup gluten-free 1-to-1 flour blend: This acts as the base, providing structure and a tender crumb without gluten.
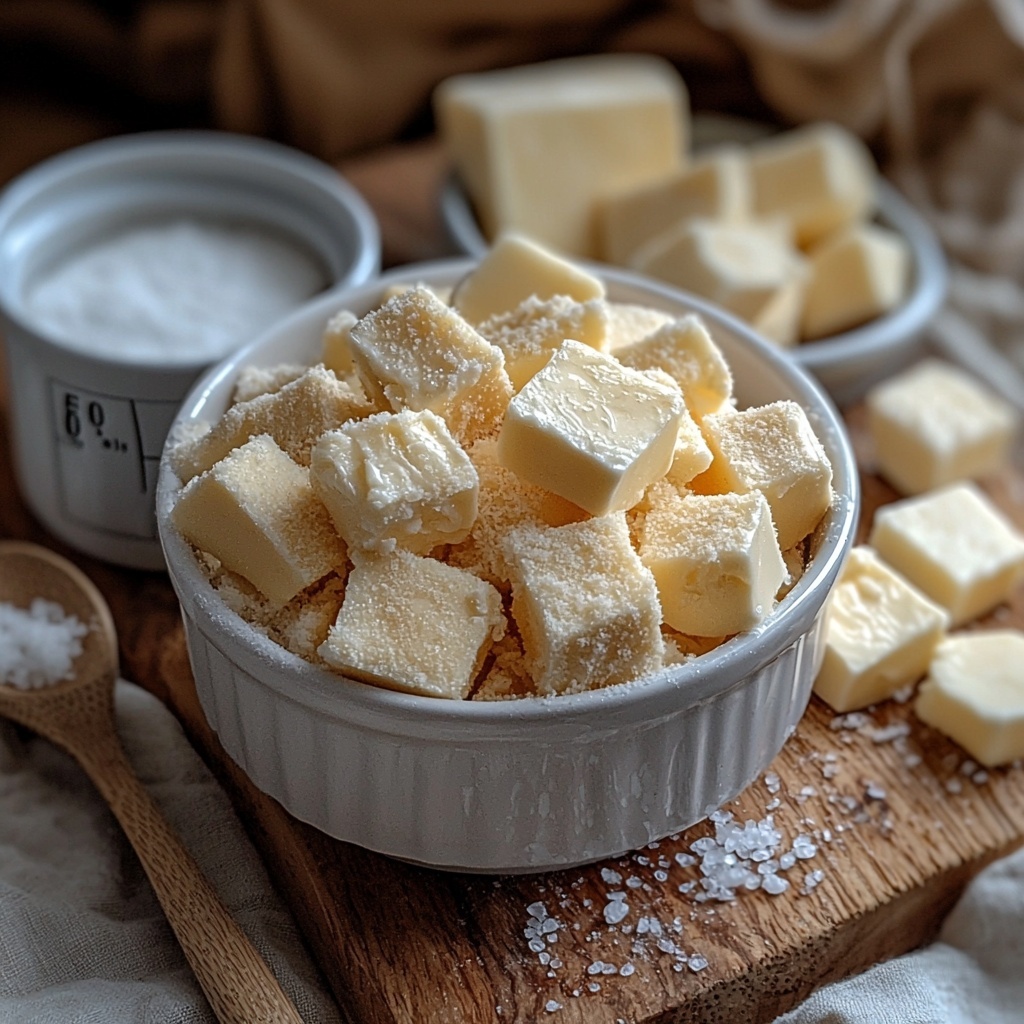
- 6 tablespoons cold butter, cubed: The secret behind that flaky, buttery texture that makes every bite irresistible.
- ¼ cup cold water: Helps bring the dough together without warming the butter, which keeps the crust flaky.
- 1 tablespoon sugar (optional): Adds a subtle sweetness that’s perfect for dessert pies but can be skipped for savory versions.
- Pinch of salt (optional): Highlights the flavors and balances the sweetness.
How to Make Homemade Gluten-Free Pie Crust Recipe
Step 1: Prepare Your Ingredients
Start by preheating your oven to 375 degrees, so it’s ready to go once your pie crust is shaped. Ensuring your butter is cold and cubed is crucial because warm butter won’t create those lovely flaky layers we’re aiming for in this homemade gluten-free pie crust recipe.
Step 2: Mix Dry Ingredients and Butter
Place the flour, butter cubes, sugar if using, and salt into the bowl of a food processor. Pulse around 20 to 25 times until the mixture looks like coarse crumbs. This is important because you want bits of butter evenly spread throughout the flour to achieve that ideal flakiness.
Step 3: Add Cold Water and Form Dough
Next, pour in the cold water and pulse just enough for the dough to stick together and start forming a ball. Be careful not to overwork it, since too much handling can make the crust tough rather than tender and flaky.
Step 4: Chill the Dough
Shape your pie crust dough into a round disc, then sandwich it between two sheets of wax paper and refrigerate for at least 20 to 30 minutes or even overnight. This chill time lets the butter firm back up and lets the gluten-free flours hydrate properly, resulting in a more manageable dough and a better texture once baked.
Step 5: Roll Out the Dough
Keep the dough between the wax paper sheets and roll it gently into an 11 to 12-inch circle. The wax paper prevents sticking and makes transferring the dough to your pie dish a breeze. Patience here will pay off with a beautifully even crust.
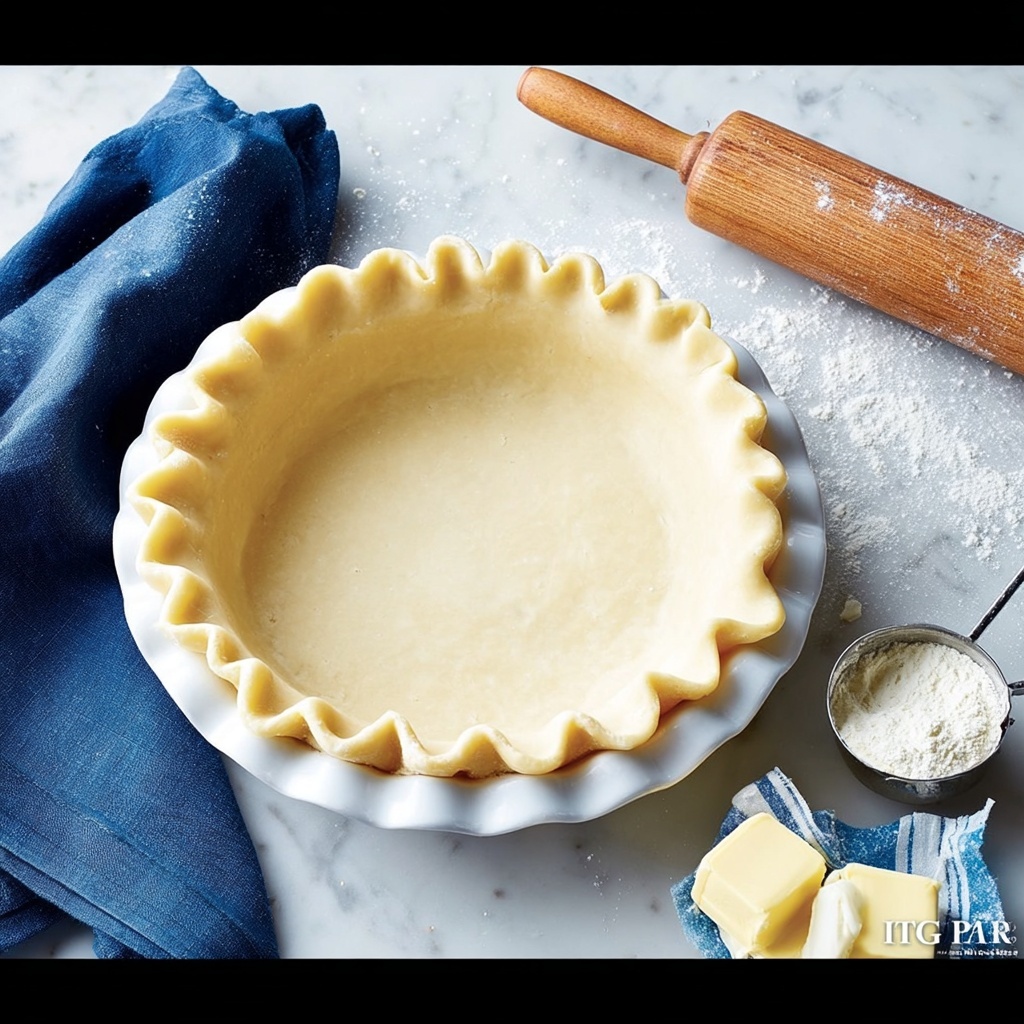
Step 6: Transfer to Pie Dish
Remove the top sheet of wax paper and flip the dough circle gently into a 9-inch ceramic or glass pie dish that has been lightly sprayed with non-stick cooking spray. Press the dough gently to cover the base and sides evenly without stretching.
Step 7: Prepare for Baking
Before baking, pierce the bottom of the dough lightly with a fork to prevent bubbles from forming. This step ensures an even bake and a crust that’s crisp throughout—an important touch for that perfect pie foundation.
Step 8: Blind Bake the Crust
Line the crust with parchment paper or aluminum foil, then fill it with pie weights or dried beans to keep it from puffing up during baking. Bake in the preheated oven for about 15 minutes. This step gives the crust a head start, making sure it’s cooked through before adding any filling.
Step 9: Remove Weights and Bake Again
Carefully take out the weights and lining, then bake the crust for another 10 to 15 minutes until it’s golden and fully set. The result will be a gluten-free pie crust that has a stunning golden color and a crisp, tender bite.
Step 10: Cool Before Filling
Let the crust cool completely on a wire rack before filling. This ensures the filling won’t cause the crust to become soggy and maintains that beautifully flaky texture that makes this Homemade Gluten-Free Pie Crust Recipe so special.
How to Serve Homemade Gluten-Free Pie Crust Recipe
Garnishes
When serving pies with this crust, consider simple garnishes like fresh berries or a light dusting of powdered sugar to highlight the beautiful golden color and texture. If it’s a savory pie, fresh herbs like thyme or rosemary can add an aromatic touch that compliments the crust wonderfully.
Side Dishes
This pie crust works wonderfully with a variety of pies—serve your sweet versions alongside vanilla ice cream or a dollop of whipped cream to elevate the dessert experience. For savory pies, a crisp green salad or roasted vegetables make excellent companions that balance richness with freshness.
Creative Ways to Present
Get playful by using pie crust cutters to create decorative edges or shapes that can be baked as toppings or accents. This Homemade Gluten-Free Pie Crust Recipe is versatile, so don’t hesitate to experiment with lattice tops, cut-out silhouettes, or even mini hand pies to wow your family and friends.
Make Ahead and Storage
Storing Leftovers
If you have any leftover pie crust or baked pie, store it tightly covered in the refrigerator. Use plastic wrap or an airtight container to keep the crust from drying out. It will stay good for up to 3 days while retaining its fresh flavor and texture.
Freezing
This dough freezes beautifully. Wrap the disc tightly in plastic wrap and then foil before freezing for up to 3 months. When ready to use, thaw in the refrigerator overnight; still cold and firm dough rolls out easier and yields better results in your baking.
Reheating
To reheat a baked pie crust or pie, place it in a preheated oven at 350 degrees for about 10 minutes. This refreshes that crisp texture and warms the pie evenly without making it soggy or tough.
FAQs
Can I substitute butter with coconut oil in this recipe?
While you can use coconut oil as a substitute, keep in mind it has a distinct flavor and a lower melting point than butter, which could affect the flakiness and taste of your homemade gluten-free pie crust recipe. If you’re okay with a slight coconut undertone, it can work well.
Why does gluten-free pie dough sometimes crumble when rolling out?
Gluten-free flours lack the elasticity that gluten provides, so chilling the dough thoroughly and rolling it between wax paper helps prevent crumbling. Also, adding just enough cold water to bind the ingredients and handling the dough gently is key to success.
Is it necessary to blind bake the crust?
Blind baking sets the crust before filling, which is essential for pies filled with wet or no-bake fillings to prevent sogginess. If your filling requires baking after assembling, you may skip blind baking, but expect a softer crust.
Can I use this crust recipe for savory pies as well?
Absolutely! This Homemade Gluten-Free Pie Crust Recipe works beautifully for both sweet and savory pies. Simply omit the sugar and perhaps add a pinch more salt or herbs to complement your savory filling.
What is the best flour blend to use for this recipe?
A gluten-free 1-to-1 blend designed for baking is ideal as it balances rice flour, tapioca starch, and sometimes xanthan gum to mimic the behavior of wheat flour. Using a quality blend ensures the best texture and results for this recipe.
Final Thoughts
I cannot encourage you enough to try this Homemade Gluten-Free Pie Crust Recipe if you want that perfect pie crust without any gluten challenges. It’s straightforward, rewarding, and tastes so much better than store-bought alternatives. Once you get comfortable with this recipe, you’ll find it opens doors to all sorts of delicious pies that everyone at the table will adore.
Print
Homemade Gluten-Free Pie Crust Recipe
- Prep Time: 30 minutes
- Cook Time: 45 minutes
- Total Time: 1 hour 15 minutes
- Yield: 8 servings
- Category: Dessert
- Method: Baking
- Cuisine: American
- Diet: Gluten Free
Description
This homemade pie crust recipe provides a simple, foolproof method for creating a flaky and tender crust perfect for both sweet and savory pies. Made with basic ingredients like flour, butter, water, and optional sugar and salt, this crust is easy to prepare using a food processor and requires chilling before rolling out. The crust bakes beautifully in the oven, giving you a delicious foundation for your favorite pie fillings.
Ingredients
Pie Crust Ingredients
- 1 cup flour (gluten-free 1-to-1 blend)
- 6 Tbsp. butter (cold, cubed)
- ¼ cup cold water
- 1 Tbsp. sugar (optional)
- Pinch of salt (optional)
Instructions
- Preheat the oven. Set the oven temperature to 375 degrees Fahrenheit so it is ready for baking your pie crust after preparation.
- Mix dry ingredients and butter. In the bowl of a large food processor, combine the flour, cubed cold butter, sugar, and salt. Pulse the mixture 20-25 times until it resembles a coarse crumb texture with pea-sized bits of butter still visible.
- Add water and form dough. Slowly pour in the cold water while pulsing intermittently until the dough starts to stick together and forms a cohesive ball.
- Chill the dough. Shape the dough into a flat disc and place it between two sheets of wax paper. Refrigerate for 20-30 minutes, or up to overnight, to relax the gluten and firm up the butter for better rolling.
- Roll out the dough. Keeping the wax paper on the dough, roll it out into an 11-12 inch diameter circle, ensuring an even thickness all around.
- Transfer to pie dish. Remove the top wax paper and carefully flip the dough into a lightly sprayed 9-inch ceramic or glass pie dish.
- Press and fit the dough. Gently press the dough into the bottom and sides of the pie dish to cover it completely without stretching.
- Trim and seal edges. Trim any excess dough hanging over the edges, leaving about 1/2 inch. Fold the edges under and crimp as desired to form a decorative border that seals the crust.
- Dock or line the crust. Using a fork, prick the bottom of the crust several times to prevent bubbling during baking. Optionally, line the crust with parchment paper or foil and fill with pie weights or dried beans for blind baking.
- Bake the pie crust. Bake in the preheated 375°F oven for approximately 35-45 minutes until golden brown and fully cooked. If using pie weights, remove them and foil/parchment during the last 10 minutes to brown the crust evenly.
Notes
- Use cold butter and cold water to ensure a flaky crust by preventing the butter from melting before baking.
- If you don’t have a food processor, you can cut the butter into flour using a pastry cutter or your fingers until coarse crumbs form, then mix in the water by hand.
- The optional sugar adds slight sweetness, ideal for dessert pies, while salt enhances flavor.
- Chilling the dough for at least 20 minutes helps relax gluten and firms up the dough for easier handling.
- To prevent the crust from shrinking, avoid stretching the dough when fitting it into the pie dish and chill it again before baking if possible.
- Blind baking is recommended for pies with no-bake fillings or custards to prevent a soggy bottom crust.


