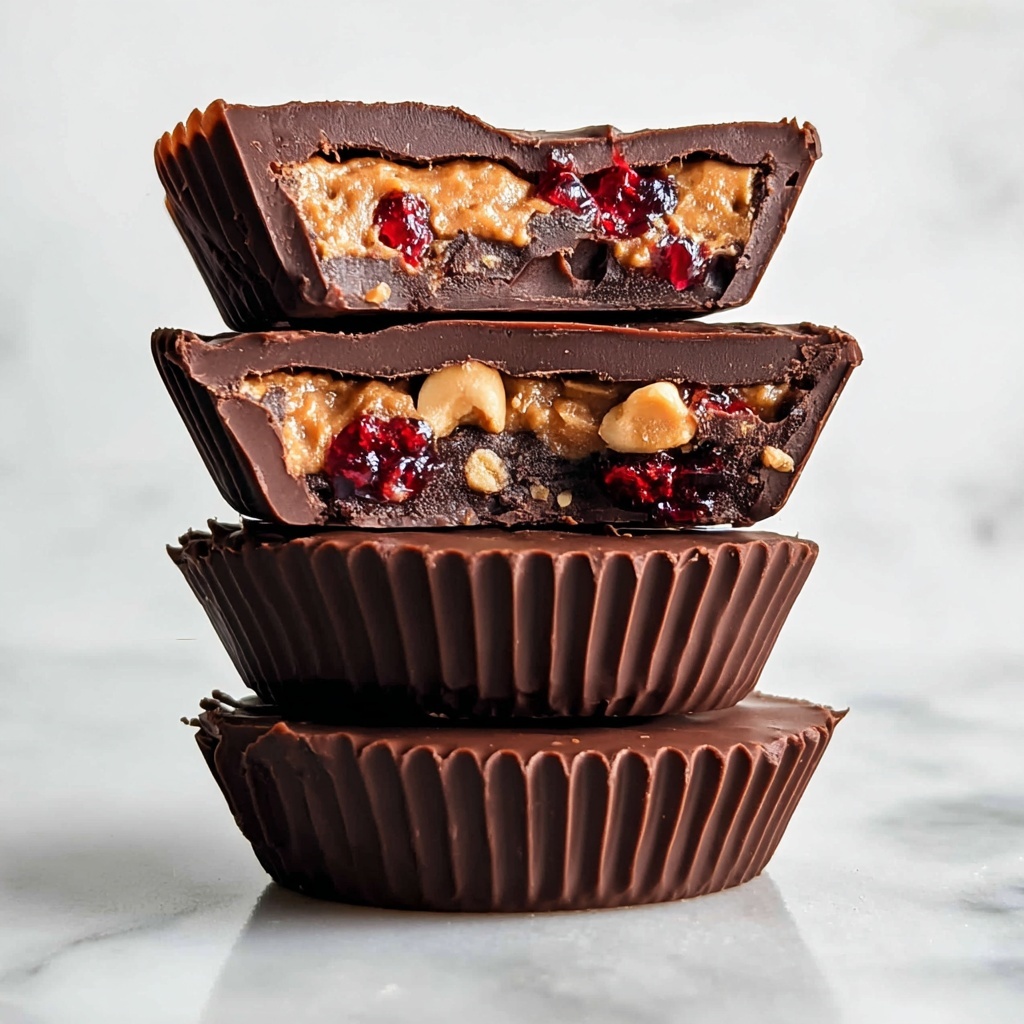
If you adore the classic combination of peanut butter and jelly but want to elevate it into a sophisticated, bite-sized treat, then you are going to fall head over heels for this PB&J Chocolate Cups Recipe. These delightful little cups marry smooth dark chocolate, creamy peanut butter, and a burst of fruity jam, all crowned with a sprinkle of flaky sea salt. They are quick to make, incredibly satisfying, and perfect for sharing or sneaking a sweet indulgence any time of the day.

Ingredients You’ll Need
The magic behind these PB&J Chocolate Cups Recipe lies in its simple but thoughtfully chosen ingredients. Each component plays a crucial role in building layers of flavor and texture, providing a perfect balance of sweet, salty, and rich notes.
- Dark chocolate chips: Quality dark chocolate adds depth and a slightly bitter contrast to the sweetness of the peanut butter and jam.
- Coconut oil: Helps melt the chocolate smoothly and gives the cups a glossy, professional finish.
- Creamy peanut butter: Adds a silky richness and nutty flavor that’s essential for that authentic PB quality.
- Jam or jelly: Offers a fruity, tangy sweetness that brightens every bite.
- Flaky sea salt: A small pinch enhances all the flavors and adds a delightful crunch against the smooth chocolate.
How to Make PB&J Chocolate Cups Recipe
Step 1: Melt the Chocolate
Begin by melting your dark chocolate chips in a microwave-safe bowl, heating in 30-second bursts and stirring in between to ensure the chocolate melts evenly without burning. Then, stir in the coconut oil until it’s fully combined and gives the chocolate a smooth, glossy texture that will set beautifully as it cools.
Step 2: Form the Chocolate Base
Place 12 muffin liners on a flat surface like a sheet pan or cutting board. Spoon about two to three teaspoons of the melted chocolate into each liner. Gently roll each liner so the melted chocolate rises about a quarter inch along the sides, creating a sturdy shell to hold the peanut butter and jam fillings.
Step 3: Chill Until Firm
Pop the tray in the refrigerator for 5 to 10 minutes, allowing the chocolate cups to harden completely. This step is crucial to give your cups a solid base before adding the fillings.
Step 4: Add the Peanut Butter Layer
Once the chocolate shells have set, use the back of a spoon to add a dollop of creamy peanut butter into each cup. Spread it gently toward the edges, ensuring every bite gets a smooth and rich peanut butter experience.
Step 5: Top with Jam
Next, place a small dollop of your favorite jam or jelly atop the peanut butter. Whether you choose strawberry, raspberry, or something more adventurous, the jam adds a perfect burst of fruity sweetness that complements the nutty peanut butter and the bitter dark chocolate.
Step 6: Seal with Chocolate and Salt
Pour the remaining melted chocolate over each cup to seal in the peanut butter and jam. Before the chocolate fully sets, sprinkle a tiny pinch of flaky sea salt on top of each cup to add a touch of crunch and intensify the flavors.
Step 7: Final Chill
Refrigerate the completed cups for at least 30 minutes or until the chocolate has fully hardened. Once firm, these PB&J Chocolate Cups are ready to enjoy or gift to someone special.
How to Serve PB&J Chocolate Cups Recipe

Garnishes
A sprinkle of extra flaky sea salt on top just before serving enhances the taste beautifully. You can also add finely chopped peanuts for a little extra texture or a small fresh berry for a pop of color and freshness.
Side Dishes
These chocolate cups pair wonderfully with a cup of hot tea or coffee, balancing their richness. For a brunch vibe, serve alongside fresh fruit or light yogurt to keep the meal satisfying without overwhelming your palate.
Creative Ways to Present
Think beyond muffin liners: serve these PB&J Chocolate Cups on a pretty dessert plate with drizzles of melted chocolate or a dusting of powdered sugar. For parties, arrange them in cupcake wrappers on a tiered stand for a charming display that’s sure to impress your guests.
Make Ahead and Storage
Storing Leftovers
Store any leftover PB&J Chocolate Cups in an airtight container in the refrigerator. They will remain fresh and delicious for up to a week, making for a perfect ready-to-eat treat anytime cravings hit.
Freezing
If you want to enjoy these cups later, freezing works wonderfully. Place them in a single layer on a baking sheet to freeze individually before transferring to a freezer-safe bag or container. They will keep well for up to 2 months.
Reheating
Since these cups are best enjoyed chilled, allow frozen cups to thaw in the refrigerator for about an hour before serving. Avoid microwaving to preserve the texture and flavor of the chocolate and fillings.
FAQs
Can I use milk chocolate instead of dark chocolate?
Absolutely! Milk chocolate will add a sweeter, creamier flavor profile, which some people prefer. Just remember that the balance of sweetness will shift, so choose your jam accordingly to keep the flavors harmonious.
What type of jam works best in the PB&J Chocolate Cups Recipe?
Strawberry, raspberry, or grape jelly are classic choices. However, you can experiment with any jam or jelly you love. Fruity preserves with a smooth consistency work best for easy spreading and a pleasing texture.
Is it necessary to use flaky sea salt?
While flaky sea salt creates a delightful crunch and flavor contrast, if you don’t have it on hand, you can use regular fine salt sparingly or skip it entirely. Just keep in mind it adds a lovely finishing touch!
Can I make these cups vegan?
Yes! Use dairy-free dark chocolate and make sure the peanut butter and jam do not contain any animal products. Coconut oil is already plant-based, so this recipe is easily adaptable for a vegan diet.
How long do these PB&J Chocolate Cups last?
Stored in the fridge, these cups will keep fresh for up to one week. If frozen, they last up to two months. Just make sure they are sealed well to prevent moisture or odors from affecting them.
Final Thoughts
I can’t recommend making this PB&J Chocolate Cups Recipe enough. It’s quick, simple, and delivers that nostalgic peanut butter and jelly flavor in the most indulgent and elegant form. Whether for a spontaneous treat or a special occasion, these tiny chocolate cups are sure to bring joy with each bite, so go ahead and whip up a batch today — your taste buds will thank you!
Print
PB&J Chocolate Cups Recipe
- Prep Time: 10 minutes
- Cook Time: 0 minutes
- Total Time: 40 minutes
- Yield: 12 pieces
- Category: Dessert
- Method: No-Cook
- Cuisine: American
Description
Delight in these easy-to-make PB&J Chocolate Cups that combine the rich flavors of dark chocolate, creamy peanut butter, and sweet jelly, topped with a hint of flaky sea salt. Perfect as a quick treat or party snack, these no-bake cups come together in just minutes and require simple ingredients for a nostalgic yet gourmet twist on the classic peanut butter and jelly sandwich.
Ingredients
Chocolate Layer
- 1 cup dark chocolate chips
- 1/2 tablespoon coconut oil
Filling
- 1/4 cup creamy peanut butter
- 1/4 cup jam or jelly (any flavor)
Topping
- 1/2 teaspoon flaky sea salt
Instructions
- Melt the chocolate: In a microwave-safe bowl, melt the dark chocolate chips in 30-second increments, stirring after each until smooth. Stir in the coconut oil until fully combined and melted to create a glossy chocolate mixture.
- Prepare the base: Line a sheet pan or cutting board with 12 muffin liners. Spoon 2-3 teaspoons of the melted chocolate into each liner and gently roll or tilt each liner so the chocolate coats the bottom and rises about a quarter inch up the sides, forming a shell.
- Chill the shells: Place the tray with lined cups in the refrigerator for 5 to 10 minutes until the chocolate shells have set and hardened.
- Add peanut butter: Using the back of a spoon, spread a dollop of creamy peanut butter evenly inside each hardened chocolate cup, pressing it out near the edges to fill the shell.
- Add jelly: Top each peanut butter layer with a small dollop of your chosen jam or jelly, adding sweetness and a fruity contrast.
- Top with chocolate and salt: Spoon the remaining melted chocolate over the peanut butter and jelly layers in each cup, sealing the filling inside, then sprinkle a pinch of flaky sea salt over the top for a delicate salty finish.
- Final chill: Refrigerate the assembled cups for 30 minutes or until the top chocolate layer is completely hardened and firm, ready to enjoy.
Notes
- Use high-quality dark chocolate for the best flavor and smooth texture.
- Feel free to customize the jelly flavor to your liking—strawberry, grape, or raspberry all work well.
- Ensure the peanut butter is at room temperature for easier spreading.
- Store these chocolate cups in the refrigerator in an airtight container to keep them firm.
- For a dairy-free version, confirm that your chocolate chips and peanut butter contain no dairy additives.


