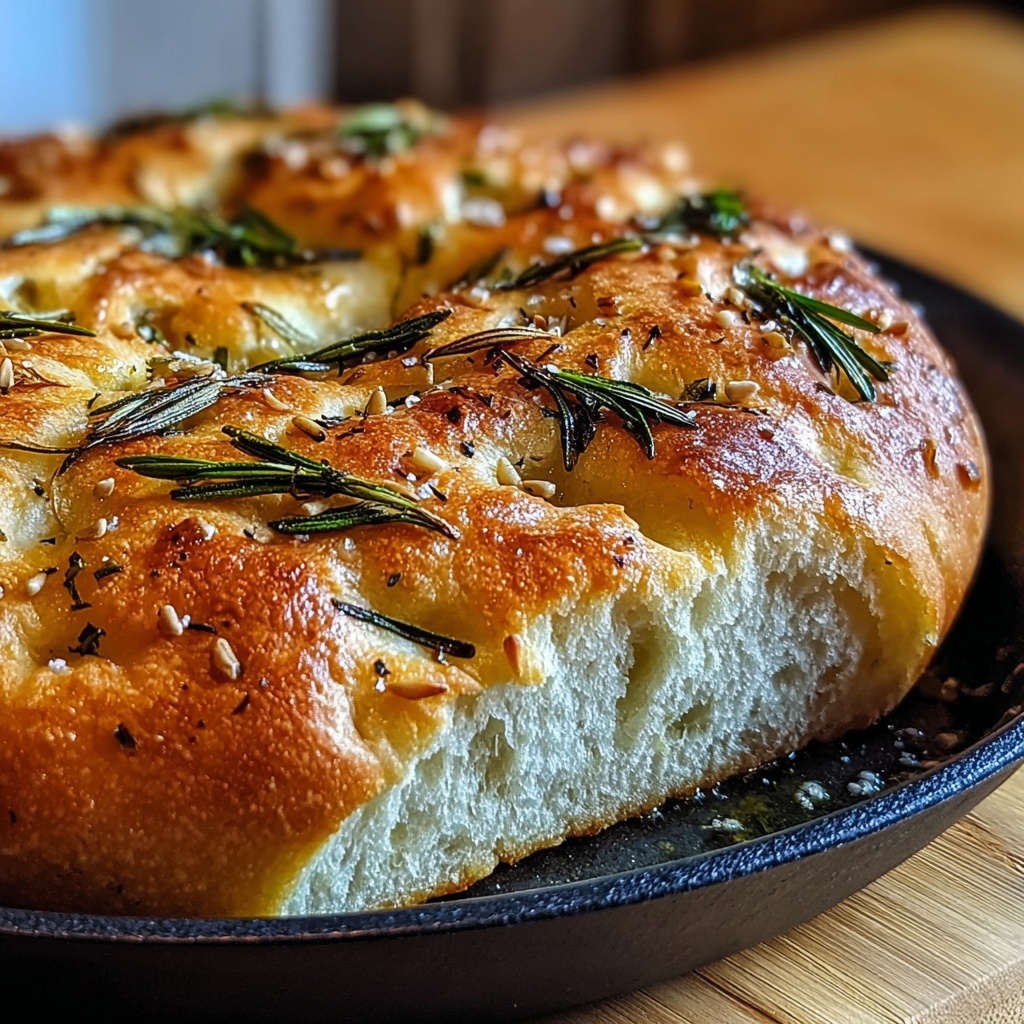
If you have a soft spot for comforting, homemade bread that fills your kitchen with irresistible aromas, you are going to fall in love with this Rustic No-Knead Rosemary Garlic Bread Recipe. It’s wonderfully simple to make, requires almost no hands-on time, and delivers a crusty exterior with a tender, flavorful crumb infused with fresh rosemary and garlic. Whether you’re a beginner baker or someone who loves quick, fuss-free bread recipes, this Rustic No-Knead Rosemary Garlic Bread Recipe is your perfect go-to for warming up any meal or simply enjoying with a good smear of butter.
Ingredients You’ll Need
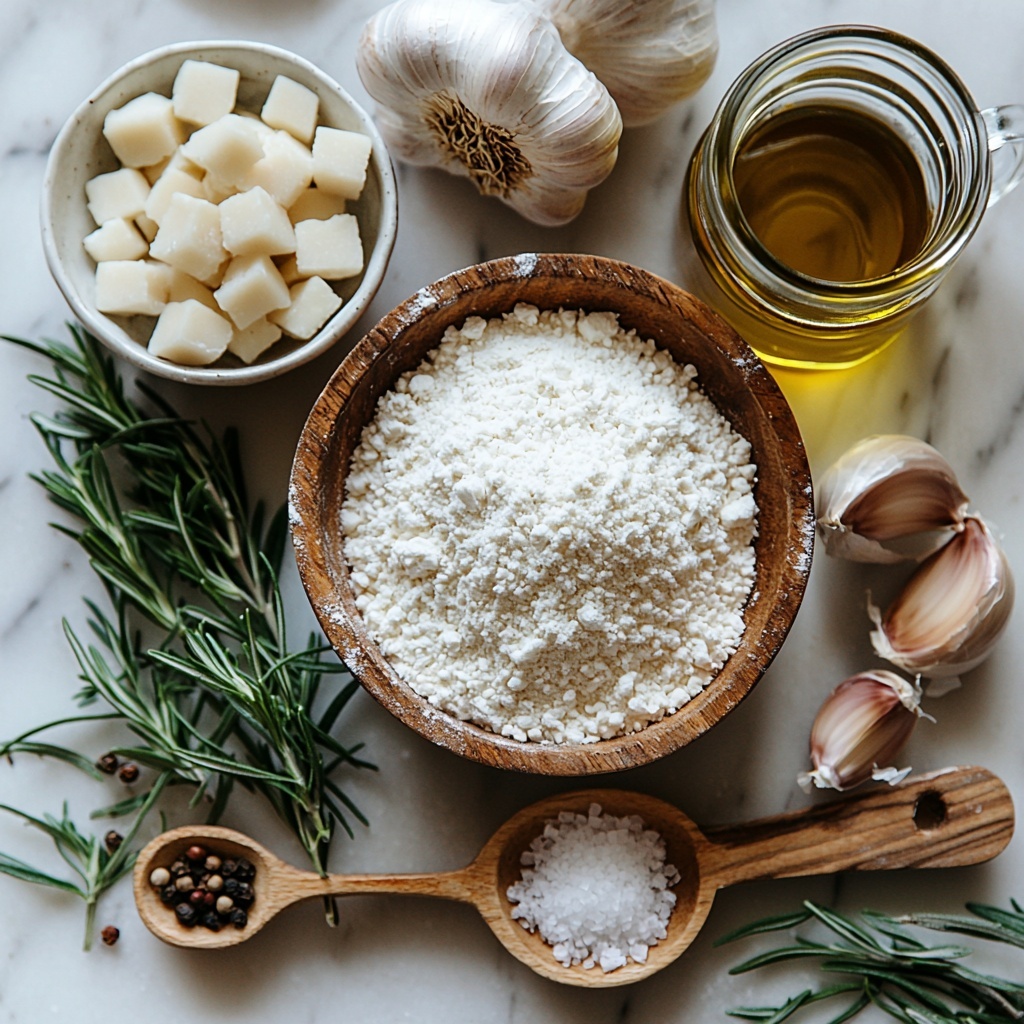
The magic of this Rustic No-Knead Rosemary Garlic Bread Recipe lies in its simplicity — just a handful of everyday ingredients combine to create a loaf bursting with flavor and beautiful texture. Each ingredient plays a crucial role, from the flour that forms the bread’s hearty base to the fresh rosemary and garlic that provide an aromatic punch.
- All-purpose flour (3 ½ cups): The foundation of this bread, giving structure and a tender crumb.
- Salt (1 ½ teaspoons): Enhances all the flavors while balancing the dough’s taste perfectly.
- Instant yeast (½ teaspoon): The gentle leavening agent that creates the loaf’s lovely rise without the need for kneading.
- Warm water (1 ¾ cups, about 110°F): Activates the yeast and forms a sticky dough essential for a rustic texture.
- Fresh rosemary, chopped (2 tablespoons): Infuses the bread with a fragrant, piney flavor that makes it utterly irresistible.
- Garlic, minced (3 cloves): Adds a savory depth and warmth, perfectly complementing the rosemary.
- Olive oil (2 tablespoons): Brings moisture and a subtle richness to the dough’s texture.
- Optional black pepper (½ teaspoon): A gentle spicy kick to elevate the flavor complexity.
How to Make Rustic No-Knead Rosemary Garlic Bread Recipe
Step 1: Combine Dry Ingredients
Start by grabbing a large mixing bowl and whisking together the all-purpose flour, salt, instant yeast, chopped rosemary, minced garlic, and optional black pepper. This step ensures the herbs and seasonings are evenly distributed, setting the stage for a uniformly flavorful loaf.
Step 2: Add Wet Ingredients and Stir
Pour in the warm water and olive oil, then stir everything with a wooden spoon or spatula until you get a sticky, shaggy dough. It’s quite loose compared to traditional bread dough, which makes this recipe so wonderfully low effort—no kneading required!
Step 3: First Rise
Cover the bowl tightly with plastic wrap and let the dough rise at room temperature for 12 to 18 hours. This slow fermentation process helps develop a beautiful airy crumb and deepens the flavor, so patience here will really pay off.
Step 4: Shape the Dough
When the dough has doubled in size and looks bubbly, lightly flour your workspace and gently turn the dough out. Shape it carefully into a round loaf without overworking it; you want to keep all those lovely air pockets intact.
Step 5: Second Rest
Place the shaped dough on a piece of floured parchment paper, cover it again with a towel or plastic wrap, and let it rest for another 30 to 45 minutes. This brief proof allows the dough to relax and rise just a bit more before baking.
Step 6: Preheat the Oven and Dutch Oven
While the dough is resting, preheat your oven to 450°F (230°C) and place your Dutch oven inside to heat for at least 30 minutes. Heating the pot beforehand creates a steamy environment that’s perfect for achieving a crispy crust.
Step 7: Bake Covered
Carefully transfer the dough with the parchment paper into the hot Dutch oven and cover it with the lid. Bake for 30 minutes, allowing the steam to work its magic on the crust and crumb.
Step 8: Bake Uncovered
Remove the lid and continue baking for another 10 to 15 minutes until the bread is a beautiful golden brown. This final step crisps up the crust to perfection and brings out a wonderful color and texture that’s unmistakably rustic.
Step 9: Cool Before Slicing
After baking, transfer your bread to a wire rack and let it cool for at least 15 minutes. Cooling is essential as it allows the interior to set properly and ensures your slices won’t turn gummy or fall apart.
How to Serve Rustic No-Knead Rosemary Garlic Bread Recipe
Garnishes
This rustic bread is already packed with flavor, but if you’d like to add a little something extra before serving, a light brush of garlic-infused olive oil or a sprinkle of flaky sea salt on freshly sliced bread can take it to the next level. Fresh rosemary leaves on top add an elegant touch and extra aroma.
Side Dishes
This bread pairs beautifully with so many dishes—imagine tearing into warm slices alongside soups, stews, or a fresh mixed green salad. It’s equally delightful served with creamy hummus, rich cheeses, or a drizzle of balsamic vinegar for dipping.
Creative Ways to Present
For a fun party or casual gathering, slice the bread into thick rounds and make mini bruschettas topped with tomatoes, basil, and mozzarella. You can also hollow out the loaf to create a bread bowl filled with creamy spinach dip or warm chili—your guests will be impressed and delighted!
Make Ahead and Storage
Storing Leftovers
Once cooled completely, store any leftover Rustic No-Knead Rosemary Garlic Bread in a paper bag or wrapped loosely in a kitchen towel to maintain the crust’s crunch while keeping the inside soft. Avoid plastic wrap for everyday storage, as it can trap moisture and make the crust soggy.
Freezing
To freeze, wrap the cooled loaf tightly in plastic wrap and then in aluminum foil, or place slices in a freezer bag with air squeezed out. The bread freezes well and can be kept frozen for up to three months without losing its wonderful texture and flavor.
Reheating
Reheat frozen bread by thawing it at room temperature, then warming in a 350°F (175°C) oven for 10 to 15 minutes until crisp on the outside and warm throughout. If reheating fresh bread, a quick toast or oven warm-up will restore that irresistible crustiness.
FAQs
Can I use dried rosemary instead of fresh?
Yes, you can substitute dried rosemary if fresh isn’t available. Use about one-third the amount since dried herbs are more concentrated in flavor. Adding it early with the dry ingredients will help release its aroma.
Do I have to use a Dutch oven?
A Dutch oven is highly recommended as it traps steam, creating the perfect crust, but if you don’t have one, you can bake the bread on a preheated baking stone or heavy pan and place a tray of water in the oven to add moisture. This helps mimic the steam effect.
Why does the dough need to rise for so long?
The long rise time develops complex flavors and improves the crumb without the need for kneading. This slow fermentation also improves digestibility and results in a wonderfully chewy texture.
Can I add other herbs or ingredients?
Absolutely! This recipe is very forgiving. You can experiment with thyme, oregano, sun-dried tomatoes, or olives for different flavor profiles. Just be mindful of the moisture content when adding wet ingredients.
How do I know when the bread is done baking?
Look for a deep golden brown crust and a hollow sound when you tap the bottom of the loaf. Internal temperature should reach about 200°F (93°C) for fully baked bread.
Final Thoughts
This Rustic No-Knead Rosemary Garlic Bread Recipe truly makes bread baking approachable, rewarding, and delicious in the most effortless way imaginable. It’s the kind of recipe you’ll return to again and again for weekend breakfasts, cozy dinners, or whenever you need a slice of homemade comfort. Go on and give it a try—you just might find your new favorite loaf!
Print
Rustic No-Knead Rosemary Garlic Bread Recipe
- Prep Time: 20 minutes
- Cook Time: 40 minutes
- Total Time: 13 hours (including rising time)
- Yield: Approximately 12 servings
- Category: Bread
- Method: Baking
- Cuisine: American
Description
This Rustic No-Knead Rosemary Garlic Bread is an easy, flavorful homemade artisan bread with fragrant fresh rosemary and garlic. Requiring minimal effort, this bread uses a long rise to develop flavor and a crispy crust by baking in a preheated Dutch oven. Perfect for serving alongside soups, salads, or enjoying on its own with butter.
Ingredients
Dry Ingredients
- 3 ½ cups all-purpose flour
- 1 ½ teaspoons salt
- ½ teaspoon instant yeast
- ½ teaspoon black pepper (optional)
Wet Ingredients
- 1 ¾ cups warm water (about 110°F)
- 2 tablespoons olive oil
Flavorings
- 2 tablespoons fresh rosemary, chopped
- 3 cloves garlic, minced
Instructions
- Combine Dry Ingredients: In a large mixing bowl, mix together the flour, salt, instant yeast, chopped rosemary, minced garlic, and optional black pepper until evenly distributed.
- Add Wet Ingredients and Stir: Pour in the warm water and olive oil, then stir thoroughly until a sticky dough forms with no dry flour remaining.
- First Rise: Cover the bowl tightly with plastic wrap and let the dough rise at room temperature for 12-18 hours, or until it has doubled in size and is bubbly.
- Shape Dough: Lightly flour a clean surface and gently transfer the dough onto it. Shape it into a round loaf carefully to retain air bubbles, avoiding overhandling or kneading.
- Second Rest: Place the shaped dough on a piece of parchment paper dusted with flour. Cover it loosely and let it rest for 30-45 minutes to relax before baking.
- Preheat Oven and Dutch Oven: Meanwhile, preheat your oven to 450°F (230°C). Place a Dutch oven with its lid inside the oven to heat for about 30 minutes to ensure it’s very hot for baking.
- Bake with Lid On: Carefully lift the hot Dutch oven out of the oven and transfer the dough along with the parchment paper into it. Cover with the lid and bake for 30 minutes to trap steam for a crusty exterior.
- Bake Without Lid: Remove the lid and continue baking the bread for an additional 10-15 minutes until the crust turns a deep golden brown and the loaf sounds hollow when tapped.
- Cool Bread: Remove the loaf from the Dutch oven and place it on a wire rack to cool completely for at least 15 minutes before slicing. This completes the resting process so the crumb sets perfectly.
Notes
- Use a kitchen thermometer to ensure your water is around 110°F to properly activate the yeast.
- Letting the dough rise slowly overnight develops better flavor and texture in the bread.
- Do not skip preheating the Dutch oven; it creates steam that is crucial for a crispy crust.
- Handle the dough gently to keep the air bubbles intact, which helps achieve an open crumb.
- Store leftover bread in a paper bag to maintain crust texture, and refresh in a warm oven if it softens.


